Messages: Please use the inbrite.com forum for our discussions & Q&A.

News: It is reported that iTunes 9 is compatible with jailbroked iPhones... Now I got an iPhone 3GS. I will be posting something about it...

Sponsors links:

Monday, February 26, 2007

Edit font in LangPack

How to edit font in LangPack
This guide is based on the comment by Lucas. All credits to him.

Tools you need:
Binary Editor
SHXCodec or RandomSHX

Steps:

1) Open a LP or a MP using SHXCodec, then split it to obtain the CG4 SMG file. (It can be found in the same folder where you put the LP/MP.) or you can extract the LP/MP using RandomSHX

2) Move the CG4 file to another folder, then open it using the Binnary Editor

3) Press "ALT + M" to Generate Bookmarks

4) Press "ALT + S" to save the bookmarks at name as for example "matrix"

5) Select ALL bookmarks and press "ALT + G" to generate Font Map, save it with the same name "matrix"

6) Now you have 3 files, one is a ".bmp", that is the Original FontMap

(Don't close the Binnary Editor)

7) Edit the .bmp to add the Font. When finished, save it, and back to the Binnary Editor

8) Press "ALT + i", and select the "rft" file with the name that used for example, in this case "matrix", open it

9) Press "Select ALL" and "Import FontMap" and "Close"

10) Close the Binnary Editor

11) Open SHX CODEC, delete all CG except "RAM DOWNLOADER" and "CG4 Language Pack", then select "CG4 Language Pack" press "Replace" and select the CG4 that you edit with BinnaryEditor. Compile SHX file and flash the phone with this. (If you were using RandomSHX to extract the SHX file, you can recompile the SHX using RandomSHX.)

Download:
BinaryEditor: [4shared]

Sponsors links:

Java corelet/midlet permission & iTunes menu icon

How to patch Motorola firmware to have full Java corelet/midlet permission & iTunes menu icon
for R4513 V360/L7
This guide will show you how to patch the R4513 firmware in order to install java corelet (such as iTunes & mediaviewer) and midlets with full permission, and also putting iTunes menu icon.

What you need:
- A R4513 firmware patched to bypass RSA signature verification, and the extracted CG1 bin file. (Read this post about RSA patching first if you are not sure about RSA patch.)
- HexEditor
- P2K software (P2kTools or moto4lin)
- j2me_domain_registry.sm file

Steps:

1. open the CG1 bin file with a HexEditor, such as XVI32;

2. search for this hex string;
B5 FF B0 91 20 00 90 05 90 04 27 0F 1C 1C 22 0C
then change the hex string to:
B5 FF B0 91 20 00 E0 10 90 04 27 0F 1C 1C 22 0C

3. search for this hex string;
1C 05 D1 04 48 37 30 4C F7
then change
1C 05 D1 04 48 37 30 4C F7 ?? ?? ?? E0 DD
to
1C 05 D1 04 48 37 30 4C F7 ?? ?? ?? E0 DE

(?? ?? ?? are three offsets which are different in different firmware, for example, in B7R it is BD F8 0C, in AER it is BD FC 46, in 0FR it is BA F9 F6)

4. search for this hex string;
B5 70 25 00 00 6B 18 1A 78 52 2A 01 D0 09 2A 02
then change the hex string to:
20 01 47 70 00 6B 18 1A 78 52 2A 01 D0 09 2A 02

5. search for this hex string;
20 00 22 02 00 41 5C 6B 2B 05 D1 00 54 6A
then change the hex string to:
35 01 22 03 00 41 5C 6B 2В 04 DA 00 54 6A

6. search for this hex string;
495244414C696E6B0000000000000000000000000000000000 0000001400001CFFFF00E5
then change the hex string to:
4954554E455300000000000000000000000000000000000000 00000014000076FFFFFFFF

(steps 2-5 is patch for java midlet permission, which step 6 is patch for iTunes menu icon.)

7. save the file. Now you have the patched CG1 bin file.

8. follow RSA patch guide to recompile the MP with the patched CG1, then flash it to your phone.

9. after flashing, install iTunes as Corelet on your phone using Motomidman.

10. download the j2me_domain_registry.sm file.

11. use P2k software to backup the original j2me_domain_registry.sm file (in '/a/mobile/certs/root/x509/kjava'), then replace it with the new downloaded file.

12. set iTunes as SIGNED and CORELET using motomidman, then restart your phone.

13. use P2k software to download the /a/mobile/system/mma_ucp file, make a backup, then edit it to add ITUNES menu item. Read this guide if you are not sure how to edit mma file.

14. upload the new mma_ucp file to /a/mobile/system of your phone using p2k software, then restart your phone.

15. you can install other non-corelet java midlets using the bluetooth or midway method. Read this guide for details.

Done. Now you have iTunes with menu icon and java midlets with full permission.

Download:
j2me_domain_registry.sm: [inbrite.com]

Sponsors links:

Friday, February 23, 2007

Change boot picture - part 2

Change boot picture
part 2: replace it using splash replacer
This guide shows you how to replace the startup splash picture using motorola bootscreen replacer.

Tool you need:
Motorola bootscreen replacer
RandomSHX or SHXCodec

Steps:
1. use RandomSHX or SHXCodec to extract/split the MP that you want to mod;

2. Open Offset.ini in folder of motorola bootscreen replacer, to check if the your phone model and firmware are defined in the ini file;

3. if it is defined, go to next step; if not, defined it accordingly if you know the offsets for your firmware. If you don't know the offsets, follow part 1 guide to find out the offsets.

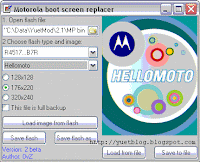
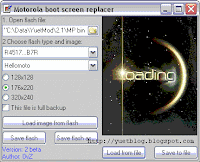
4. open Motorola Bootscreen Replacer and open the flash file (the *2.bin file or the *CG1.smg file you got in step 1);


5. select the "Choose flash type and image" according to your phone model and firmware, for example, V360 R4513...ABR;

6. click "Load from file" and select your custom bmp file that match your screen size;


7. click "Save Flash";

8. follow my "RSA patch" guide to patch RSA and recompile the MP using the new flash file.

Download:
Motorola bootscreen replacer: [4shared]

Sponsors links:

Change boot picture - part 1

Change boot picture
part 1: find out the address of the picture in the flash
You may know that you can use motorola bootscreen replacer to replace the boot pictures (Hellomoto or Welcome pictures). However, before you can do that, you need to find out the address of the pictures in the flash, unless the address is already known and configured in the bootscreen replacer. This guide will show you how to find out the address and configure it in motorola bootscreen replacer.

There are two ways to find out the offsets, the graphical way and the Hex way.

Method 1: the graphical way

Tool you need:
Corona_editor
RandomSHX or SHXCodec

Steps:
1. use RandomSHX or SHXCodec to extract/split the MP that you want to mod;

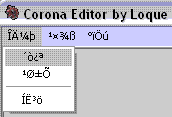
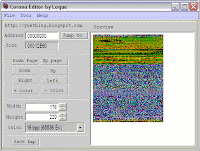
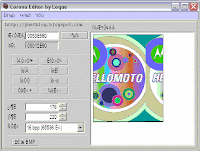
2. open the CG1 bin/smg file in Corona_editor, as shown in following screen;


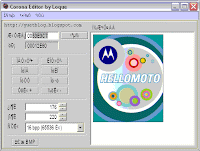
This is translation of the Corona_editor screen:


3. set width/height/color according to your phone, for example, 176/220/16bpp respectively;

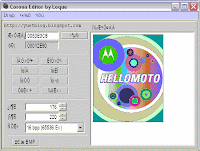
4. click "jump to", then repeat clicking "Down page" until you find a screen similar to the following one;


5. click "Down/Up/Right/Left" button to adjust the picture position, until you see the full picture on screen;


6. click "+ Color" button to have a nicer preview, re-adjust the position if necessary;


7. write down the address, for example: 53E3C7

8. if you want to also replace the Welcome screen, repeat steps 4-7 to find out the address for the "Welcome" picture;

9. open offset.ini file in the folder of motorola bootscreen replacer, add the offset setting as follows;


"backup_shift" is the starting offset of CG1. "backup_shift=92000" is the setting for V360/L7. Other model may have different offset.

10. you are ready to replace the bootscreen pictures. In part 2, I will show you how to replace the boot picture using motorola bootscreen replacer.

(The offset you got using the above method might not be 100% correct, but it is near. You can use the 2nd method to verify the offset.)

Method 2: the Hex way (more accurate)
11. open the CG1 bin in a HexEditor, search for the following Hex strings to find the Hellomoto picture;

14 15 14 15 14 15 14 15 14 15 14 15 14 15 14 15 14 15 14 15 14 15 14 15 14 15 14 15 14 15 14 15 14 15 14 15 14 15 14 15 14 15 14 15 14 15 14 15 14 15 14 15 14 15 14 15 14 15 14 15 14 15 14 15 14 15 14 15 14 15 14 15 14 15 14 15 14 15 14 15 14 15 14 15

12. the offset of the first "14" minus 1 will be the address of the Hellomoto picture;


13. search for the following Hex strings to find the Welcome picture;

F8 00 F8 00 F8 00 F8 00 F8 00 F8 00 F8 00 F8 00 F8 00 F8 00 F8 00 F8 00 F8 00 F8 00 F8 00 F8 00 F8 00 F8 00 F8 00 F8 00 F8 00 F8 00 F8 00 F8 00 F8 00 F8 00 F8 00 F8 00 F8 00 F8 00 F8 00 F8 00 F8 00 F8 00 F8 00 F8 00 F8 00 F8 00 F8 00 F8 00 F8 00 F8 00

14. the offset of the first "F8" minus 1 will be the address of the Welcome picture;


15. follow steps 9 & 10.

Download:
Corona_editor: [4shared]

Sponsors links:

Tuesday, February 20, 2007

Sync V360/L7 with Desktop iTunes

Make iTunes on V360/L7 sync with Desktop iTunes
An idea by Yuet
I believe these steps can make desktop iTunes recognise our V360/L7. At the moment I don't have time to test and verify it, so it's just an idea. If you are a pro modder having a V360/L7 with R4513 firmware, I invite you to test it and let us know the result.

Update: this method is verified NOT working, so don't try it until I have more finding, Believe me, we will find the way. I am making good progress...

Before you start:
Always make backup of your phone, including data/software/PDS/bootloader, etc.

What you need: (Download at the bottom of this post)
1. TomeQ 0371_0001.seem
2. PDSTool
3. P2K Easy Tool v3.9 Cracked (if you can't find it, this is a hint.)

Disclaimer: Doing the following steps might void your warranty or damage your phone. I, Yuet, shall not be responsible for any damage to your phone by following the steps, so do it at your own risk.
If you want to post this article elsewhere or translate to other language, please quote the original author and link to this Blog.

Steps:

Part 1 - prepare the PDS.bin file
1) Download and install PDSTool; Download TomeQ 0371_0001.seem and rename the 0371_0001.seem to 01C4_0001.seem;
2) Upload the renamed 01C4_0001.seem with p2ktools/motokit/moto4lin to your phone; After uploading, load it back from your phone to check if it is correctly uploaded;
3) Shutdown your phone, and press and hold * and # keys, then power on; Your phone will be in bootloader mode;
4) Connect your phone via USB and use flashbackup 2.6 or 3.0 to make a PDS backup in SMG format; (After backup, open the backup file with HexEditor to verify if it is a good backup.) (if the backup is in fbp format, rename the *.fbp to *.cab, then decompress the cab file. You'll find 2 files (backup and description). The file "backup" is the PDS backup.)
5) Rename the PDS backup to pds-original.bin and copy to the PDSTool folder.
6) Using PDSTool (by Indesign) to open the pds-original.bin
7) Then click on the PARSE button. (Then you will see a new folder name "seems" in the PDS Tool folder).
8) Go into the folder and delete file '0371'
9) Rename file 01C4 to 0371
10) Make a copy of file 01C3, and rename the copy to 01C4 (file 01C3 is same as 01C4 now)
11) Click the "assemble" at bottom tab
12) Now you will see the folder tree on the left and right is the files REQUIRED TO SELECT to make PDS.bin
13) Set the version to 4 and 009 (version 4009).
14) Goto the seems folder create by PDS tool earlier and select all the file 0001 until 0371
15) Then click assemble to compile the PDS.bin and you will find it inside the seems folder.

Part 2 - write PDS to phone
16) Follow "unlock/repair pds with testpoint" guide part 1 to make your phone detected as "S Blank Neptune LTE2"; or Testpoint your phone;
17) Start p2k easy tool;
18) Connect your phone to computer via usb;
19) In p2k easy tool, select your phone mode;
20) Click "Repair" tab, check "Write PDS";
21) Double click the text box for "Write PDS" to open the PDS.bin file, which you created in part1.
22) Click "Do Selected Jobs", and keep your fingers crossed.
23) Set it to "Memory card" in "Usb setting" on your phone, connect it via USB to see if it can be detected by desktop iTunes.
24) It is done, so please let us know the result. If anything wrong, you can follow this post to repair your phone. Good luck!

Download:
0371_0001.seem: [4shared]
PDSTool: [4shared]

Sponsors links:

Sunday, February 18, 2007

Flasher for Linux/Mac

Flasher for Linux/Mac
for Motorola P2K phones
I would like to introduce this Flasher program for Linux/Mac to you. It is reported working for V360.

Download and details at:

moto4lin.sourceforge.net

Sponsors links:

Thursday, February 08, 2007

Repair "S Blank Neptune LTE2"

How do I repair my V360 from "S Blank Neptune LTE2"
I bricked my phone about an hour ago, but I managed to save it from the "S Blank Neptune LTE2". I write down the steps here, and I hope you (if you bricked it) will be as lucky as me.

How did I brick it?
I was doing some testing with my YuetMod monsterpack. I was flashing a Flex reflash file, and at the end there was checksum error. Normally it will be ok, but this time I clicked the mouse too fast. I clicked to close RSD Lite when the phone was still showing "SW Upgrade in progress...". As a result, the phone was dead. It wouldn't power on, and I couldn't turn it into bootloader screen. Well, I was prepared to say goodbye to my V360, but I want to save it and I don't want to disappoint you. Many of you came here to ask Yuet for solution. How can Yuet tell you "I bricked my phone and I can't unbrick it. No more YuetMod MPs."? I try my luck to connect my phone and RSD Lite can detect it as "S Blank Neptune LTE2". This gave me a dim light and a slim hope. I tried a few things, but I will only tell you the successful steps here.

What you need?
P2K Easy Tool v3.9 Cracked (if you can't find it, this is a hint.)

Disclaimer: Doing the following steps might void your warranty or damage your phone. I, Yuet, shall not be responsible for any damage to your phone by following the steps, so do it at your own risk.
If you want to post this article elsewhere or translate to other language, please quote the original author and link to this Blog.

Warning: Don't try this if you have cingular L7 with 4517 firmware. These steps won't work for this model.

Steps:
1. Start p2k easy tool
2. take out battery from phone, and put it back
3. connect your phone to computer via usb
4. in p2k easy tool, select your phone mode (V360 for me)
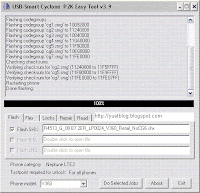
5. click "Repair" tab, check "Full repair PDS zone (with DSP checksum)"
6. click "Do Selected Jobs", in a minute you should see messages like "repair ok"

7. if you are unlucky and repair failed, try charge your battery and start from step 1 again
8. unplug & plug USB cable, take out battery and put it back, wait a few second for PC to detect your phone; click "Flash" tab, check "Flash SHX", make sure phone model is correct
9. double click the text box for "flash SHX" to open a full SHX file for your phone. For my case, I use my 2ER backup SHX
10. click "Do Selected Jobs", and wait for the flashing to complete

11. your phone is alive again

About my phone:
My phone is V360 with 08.A0 bootloader. I think these steps should work for V360/L7 with R4513 firmware, and maybe other motorola phones in the list of phone model in p2k easy tool. Anyway, do it at your own risk.

Sponsors links:

yuetblog.blogspot.com Web