Messages: Please use the inbrite.com forum for our discussions & Q&A.

News: It is reported that iTunes 9 is compatible with jailbroked iPhones... Now I got an iPhone 3GS. I will be posting something about it...

Sponsors links:

Showing posts with label Moto Modding Guide. Show all posts

Thursday, February 28, 2008

How to Enable EDGE (by Last1Left)

How to Enable EDG
by Last1Left @ inbrite.com


1. In P2kseem open seem 0341_0001, offset 00:
а) if the value is 00, open seem 02AE_0001, and enter this values beginnig from offset 00: 0A 05 04 02 01 02 00 00
б) if the value is 01, open seem 0340_0001, and enter this values beginnig from offser 00: 09 05 03 02 01 02 00 00
write to the phone, not reboot!
Alternatively, you can experiment which one affects the speed? And change the value seem 0341_0001 (at 00 or 01)
and then choose a) or b) (see item 1 above)
2. open seem 02AF_0001, and enter at offset 01 value 75 or 77
write to the phone, not reboot!
3. open seem 010A_0001 and enter at offset 00 the value 03
(GPRS auto-detach),
write to the phone, not reboot!
4. open 0032_0001, and enter at offset 89 the value 0C
its similar with this values in P2kae:
bit 1098 "EDGE_ICON_AVAILABLE" - On
bit 1099 "HIDE_GPRS_TRANSFER_IN_EDGE_AVAILABLE" - On
5. Reboot phone

Originally posted in this thread in inbrite.com forum. For questions & answers please post in the forum.

Sponsors links:

Tuesday, July 10, 2007

Make MPs compatible with sticky firmwares

Make your MPs compatible with sticky firmwares AER/E0R
Russian hackers announced a great CG1 patch. With this patch, you can make your MPs also compatible with phones with AER/E0R. You don't need to get rid of the sticky firmware any more.

This patch was brought to me by coccolino_dbro. He has tried it on his V360 successfully. I also tried. I flashed to AER, then I can flash successfully to my newly created YuetMod v1.9a MP, which is based on ABR.

Use V360 ABR as an example, you can follow these steps to apply the patch to your MP.
(Assume you already know how to apply RSA patch and compile MP.)
1. split/extract your MP, which has RSA protection removed.
2. use XVI32 to open the CG1 file.
3. press Ctrl + G and jump to hex offset 386A8.
4. replace the Hex values from 477846C0 to 20014770.
5. press Ctrl + G and jump to hex offset A373D8.
6. replace the Hex values from 477846C0 to 20014770.
7. save CG1, then compile a new MP.

Different firmwares have different offsets, please refer to the following patch codes for your firmware version:

V360 ABR: (provided by coccolino_dbro)

[Patch_Code]
000386A8: 20014770
00A373D8: 20014770

[Patch_Undo]
000386A8: 477846C0
00A373D8: 477846C0


===================
V360 ACR: (provided by coccolino_dbro)

[Patch_Code]
000386DC: 20014770
00A37A08: 20014770

[Patch_Undo]
000386DC: 477846C0
00A37A08: 477846C0


===================
L7 ACR_RB:

[Patch_Code]
000386DC: 20014770
00A37A08: 20014770

[Patch_Undo]
000386DC: 477846C0
00A37A08: 477846C0

===================

Discussion thread in www.inbrite.com.

Sponsors links:

Saturday, June 23, 2007

Create skins with animated wallpaper

How to create skins with animated wallpaper
Here are the steps to make animated wallpaper for your skin.

Tool you need:
Skinner4moto

Steps

1. Prepare an animated gif file, the size of the image must be 176x220 or smaller. Name it 573.gif;

2. download skinner4moto;

3. start skinner4moto and open your skin;

4. copy the animated gif file "573.gif" into the gifs folder, which skinner4moto created after openning the skin with this name 573.gif;

5. go to Location/Size and look for ID 572, set the values of the upper-left coordinate of your gif file in "Left" and "Up" input boxes, and set the Width and Height of the gif in "Width" & "Height" input boxes;

6. go to "Yes/No Booleans" and set the ID 599 to true to enable the ID 599;

7. save the skin.

Discussion thread in inbrite forum.

Download skinner4moto: [inbrite.com];

Sponsors links:

Tuesday, May 22, 2007

Delete iTap from language pack

How to delete iTap from langpack
If you prefer the tranditional Tap input instead of iTap, you can delete iTap from the langpack using the Delete_iTap software.

Steps:

Part 1: for 08.A0/08.A2 bootloader

1. Start SHXcodec and open the LP SHX file.

2. Click "Split source SHX file". Don't close SHXCodec.

3. Start Delete_iTap program, click "Open CG" to open the code group (CG4) smg file of the langpack, which you extracted using SHXCodec in step 2;

4. Choose the language by clicking the check boxes, then click "Delete all chosen iTaps" from the selected languages. Click "Yes" to confirm.

5. Download the 08.A0 RAMDOWNLOADER.

6. in SHXCodec, click in the line which says ramdownloader, and select "replace". Replace it with the 08.A0 ramdownloader.

7. compile the langpack to get an updated SHX file. Flash the SHX to your phone to see the effect.

Part 2: for 08.D0/09.02 bootloader

1. Start RandomSHX and open the LP SHX file.

2. Click "Extract BIN files from SHX". Close RandomSHX.

3. Start Delete_iTap program, click "Open CG" to open the code group bin file of the langpack, which you extracted using RandomSHX in step 2; You can try if you are not sure which bin file is the LP. The Delete_iTap program will show an error when you open a wrong bin file.

4. Choose the language by clicking the check boxes, then click "Delete all chosen iTaps" from the selected languages. Click "Yes" to confirm.

5. Start RandomSHX, click "Create SHX file from BINs", then select the lst file, which you extracted in step 2. You will get an updated SHX file. Flash the SHX to your phone to see the effect.

Download:
RandomSHX: [inbrite.com]
SHXCodec: [inbrite.com]
Delete_iTap: [inbrite.com]
08.A0 RamDownloader: [inbrite.com]

Sponsors links:

Thursday, May 17, 2007

How to flash V360 with 08.A2 bootloader

How to prepare flash file for V360 with 08.A2 bootloader
This post is based on the post by bullfrog in inbrite.com forum. All credits to bullfrog.

The boot 08.A2 is not so complicated. Just make the idea you have an 08.A0 boot and that's it. You get error when flashing, because most of the shx files (v360) are compiled to work with 08.A0 and 08.D0 bootloaders, but indeed they are compiled with a 08.D0 ramdownloader and bootloader 08.A2 doesn't allow flash with that ramdownloader.

To make any shx (MP/LP/DRM) work with your bootloader you have to recompile the flash file with an 08.A0 ramdownloader. When you are going to flash, open the file with rsd lite and put atention in the right screen of the program, there it says the ramdownloader version of he shx, if says 08.D0, the file will not work for 08.A2 phone, if says 08.A0 it's ok.

Compatibility table between Bootloader and Ramdownloader (v360):

Bootloader 08.A0: You can use ram A0 or D0.
Bootloader 08.A2: You can use A0.
Bootloader 08.D0: You can use D0.
Bootloader 09.02: You can use D0 (If the flash has a firmware without RSA protection will not work)

How to compile any shx to 08.A2 boot?

You will need shxcodec

1) Download the 08.A0 RAMDOWNLOADER.
2) Open the shx with shxcodec and click "split".
3) Then you click in the line which says ramdownloader, and select "replace". Replace it with the 08.A0 ramdownloader you got in step 1.
4) Then compile the shx, you give a name and wait for the file creation.
5) Flash with your new SHX (Just check if says 08.A0 in the rsd lite)

(In the future I will not make seperate flash file for 08.A2 bootloader. Please always follow the steps in this post to convert the 08.D0 flash file to 08.A0.)

Sponsors links:

Saturday, March 03, 2007

Edit protected fields in Websession

How to edit protected fields in Websession
In some branded firmwares, some fields in the Websession, such as Homepage or APN are protected. When you want to edit these fields, you have only the numeric entry mode. Effectively make it impossible to change the original setting. This guide will show you how to edit the Websession to change these fields.

Tool you need:
P2K software, such as P2KTools or Moto4lin
HexEditor, such as XVI32 or HexEdit

Steps:

1. on your phone, go to Websession and go into the field that you want to edit;

2. as you can only enter numbers, just enter 99999999; (99999999 is just an example, you can enter other numbers)

3. save the setting;

4. connect your phone via USB, and open P2K software;

5. use P2K software to download the file /a/Websession from your phone to computer;

6. open HexEditor, and open the downloaded Websession;

7. in HexEditor, search for Hex String
39 00 39 00 39 00 39 00 39 00 39 00 39 00 39


8. you can it is shown 9.9.9.9.9.9.9.9 at the right side of the HexEditor. Now you can replace them with the value you want to set, for example, http://yuetblog.blogspot.com. Enter the text at the right side of the HexEditor. (The left side is the Hex values.) Remember to always replace the offset, don't insert new offset; and always leave a dot (Hex value 00) in between each character;


9. save the Websession file, and use P2K software to upload it back to /a/ on your phone;

10. restart your phone and it is done.

Sponsors links:

Monday, February 26, 2007

Edit font in LangPack

How to edit font in LangPack
This guide is based on the comment by Lucas. All credits to him.

Tools you need:
Binary Editor
SHXCodec or RandomSHX

Steps:

1) Open a LP or a MP using SHXCodec, then split it to obtain the CG4 SMG file. (It can be found in the same folder where you put the LP/MP.) or you can extract the LP/MP using RandomSHX

2) Move the CG4 file to another folder, then open it using the Binnary Editor

3) Press "ALT + M" to Generate Bookmarks

4) Press "ALT + S" to save the bookmarks at name as for example "matrix"

5) Select ALL bookmarks and press "ALT + G" to generate Font Map, save it with the same name "matrix"

6) Now you have 3 files, one is a ".bmp", that is the Original FontMap

(Don't close the Binnary Editor)

7) Edit the .bmp to add the Font. When finished, save it, and back to the Binnary Editor

8) Press "ALT + i", and select the "rft" file with the name that used for example, in this case "matrix", open it

9) Press "Select ALL" and "Import FontMap" and "Close"

10) Close the Binnary Editor

11) Open SHX CODEC, delete all CG except "RAM DOWNLOADER" and "CG4 Language Pack", then select "CG4 Language Pack" press "Replace" and select the CG4 that you edit with BinnaryEditor. Compile SHX file and flash the phone with this. (If you were using RandomSHX to extract the SHX file, you can recompile the SHX using RandomSHX.)

Download:
BinaryEditor: [4shared]

Sponsors links:

Java corelet/midlet permission & iTunes menu icon

How to patch Motorola firmware to have full Java corelet/midlet permission & iTunes menu icon
for R4513 V360/L7
This guide will show you how to patch the R4513 firmware in order to install java corelet (such as iTunes & mediaviewer) and midlets with full permission, and also putting iTunes menu icon.

What you need:
- A R4513 firmware patched to bypass RSA signature verification, and the extracted CG1 bin file. (Read this post about RSA patching first if you are not sure about RSA patch.)
- HexEditor
- P2K software (P2kTools or moto4lin)
- j2me_domain_registry.sm file

Steps:

1. open the CG1 bin file with a HexEditor, such as XVI32;

2. search for this hex string;
B5 FF B0 91 20 00 90 05 90 04 27 0F 1C 1C 22 0C
then change the hex string to:
B5 FF B0 91 20 00 E0 10 90 04 27 0F 1C 1C 22 0C

3. search for this hex string;
1C 05 D1 04 48 37 30 4C F7
then change
1C 05 D1 04 48 37 30 4C F7 ?? ?? ?? E0 DD
to
1C 05 D1 04 48 37 30 4C F7 ?? ?? ?? E0 DE

(?? ?? ?? are three offsets which are different in different firmware, for example, in B7R it is BD F8 0C, in AER it is BD FC 46, in 0FR it is BA F9 F6)

4. search for this hex string;
B5 70 25 00 00 6B 18 1A 78 52 2A 01 D0 09 2A 02
then change the hex string to:
20 01 47 70 00 6B 18 1A 78 52 2A 01 D0 09 2A 02

5. search for this hex string;
20 00 22 02 00 41 5C 6B 2B 05 D1 00 54 6A
then change the hex string to:
35 01 22 03 00 41 5C 6B 2В 04 DA 00 54 6A

6. search for this hex string;
495244414C696E6B0000000000000000000000000000000000 0000001400001CFFFF00E5
then change the hex string to:
4954554E455300000000000000000000000000000000000000 00000014000076FFFFFFFF

(steps 2-5 is patch for java midlet permission, which step 6 is patch for iTunes menu icon.)

7. save the file. Now you have the patched CG1 bin file.

8. follow RSA patch guide to recompile the MP with the patched CG1, then flash it to your phone.

9. after flashing, install iTunes as Corelet on your phone using Motomidman.

10. download the j2me_domain_registry.sm file.

11. use P2k software to backup the original j2me_domain_registry.sm file (in '/a/mobile/certs/root/x509/kjava'), then replace it with the new downloaded file.

12. set iTunes as SIGNED and CORELET using motomidman, then restart your phone.

13. use P2k software to download the /a/mobile/system/mma_ucp file, make a backup, then edit it to add ITUNES menu item. Read this guide if you are not sure how to edit mma file.

14. upload the new mma_ucp file to /a/mobile/system of your phone using p2k software, then restart your phone.

15. you can install other non-corelet java midlets using the bluetooth or midway method. Read this guide for details.

Done. Now you have iTunes with menu icon and java midlets with full permission.

Download:
j2me_domain_registry.sm: [inbrite.com]

Sponsors links:

Friday, February 23, 2007

Change boot picture - part 2

Change boot picture
part 2: replace it using splash replacer
This guide shows you how to replace the startup splash picture using motorola bootscreen replacer.

Tool you need:
Motorola bootscreen replacer
RandomSHX or SHXCodec

Steps:
1. use RandomSHX or SHXCodec to extract/split the MP that you want to mod;

2. Open Offset.ini in folder of motorola bootscreen replacer, to check if the your phone model and firmware are defined in the ini file;

3. if it is defined, go to next step; if not, defined it accordingly if you know the offsets for your firmware. If you don't know the offsets, follow part 1 guide to find out the offsets.

4. open Motorola Bootscreen Replacer and open the flash file (the *2.bin file or the *CG1.smg file you got in step 1);


5. select the "Choose flash type and image" according to your phone model and firmware, for example, V360 R4513...ABR;

6. click "Load from file" and select your custom bmp file that match your screen size;


7. click "Save Flash";

8. follow my "RSA patch" guide to patch RSA and recompile the MP using the new flash file.

Download:
Motorola bootscreen replacer: [4shared]

Sponsors links:

Change boot picture - part 1

Change boot picture
part 1: find out the address of the picture in the flash
You may know that you can use motorola bootscreen replacer to replace the boot pictures (Hellomoto or Welcome pictures). However, before you can do that, you need to find out the address of the pictures in the flash, unless the address is already known and configured in the bootscreen replacer. This guide will show you how to find out the address and configure it in motorola bootscreen replacer.

There are two ways to find out the offsets, the graphical way and the Hex way.

Method 1: the graphical way

Tool you need:
Corona_editor
RandomSHX or SHXCodec

Steps:
1. use RandomSHX or SHXCodec to extract/split the MP that you want to mod;

2. open the CG1 bin/smg file in Corona_editor, as shown in following screen;


This is translation of the Corona_editor screen:


3. set width/height/color according to your phone, for example, 176/220/16bpp respectively;

4. click "jump to", then repeat clicking "Down page" until you find a screen similar to the following one;


5. click "Down/Up/Right/Left" button to adjust the picture position, until you see the full picture on screen;


6. click "+ Color" button to have a nicer preview, re-adjust the position if necessary;


7. write down the address, for example: 53E3C7

8. if you want to also replace the Welcome screen, repeat steps 4-7 to find out the address for the "Welcome" picture;

9. open offset.ini file in the folder of motorola bootscreen replacer, add the offset setting as follows;


"backup_shift" is the starting offset of CG1. "backup_shift=92000" is the setting for V360/L7. Other model may have different offset.

10. you are ready to replace the bootscreen pictures. In part 2, I will show you how to replace the boot picture using motorola bootscreen replacer.

(The offset you got using the above method might not be 100% correct, but it is near. You can use the 2nd method to verify the offset.)

Method 2: the Hex way (more accurate)
11. open the CG1 bin in a HexEditor, search for the following Hex strings to find the Hellomoto picture;

14 15 14 15 14 15 14 15 14 15 14 15 14 15 14 15 14 15 14 15 14 15 14 15 14 15 14 15 14 15 14 15 14 15 14 15 14 15 14 15 14 15 14 15 14 15 14 15 14 15 14 15 14 15 14 15 14 15 14 15 14 15 14 15 14 15 14 15 14 15 14 15 14 15 14 15 14 15 14 15 14 15 14 15

12. the offset of the first "14" minus 1 will be the address of the Hellomoto picture;


13. search for the following Hex strings to find the Welcome picture;

F8 00 F8 00 F8 00 F8 00 F8 00 F8 00 F8 00 F8 00 F8 00 F8 00 F8 00 F8 00 F8 00 F8 00 F8 00 F8 00 F8 00 F8 00 F8 00 F8 00 F8 00 F8 00 F8 00 F8 00 F8 00 F8 00 F8 00 F8 00 F8 00 F8 00 F8 00 F8 00 F8 00 F8 00 F8 00 F8 00 F8 00 F8 00 F8 00 F8 00 F8 00 F8 00

14. the offset of the first "F8" minus 1 will be the address of the Welcome picture;


15. follow steps 9 & 10.

Download:
Corona_editor: [4shared]

Sponsors links:

Saturday, January 27, 2007

Simplified driver installation guide

Yuet's simplified motorola P2K driver installation guide
for motorola P2K cell phones
I installed WinXP recently. Today I install motorola driver on it, so I take this chance to write down the steps. It is pretty simple.

Steps: (27/01/2007 update: if these steps don't work for you, jump to here.)
1. download and install P2KTools;
2. download the motorola driver 2.9; unzip it into a folder of your choice; You should see a few .inf files in the folder.
3. start P2KTools;
4. select "Data/Fax mode" in "Connection - USB Setting" on your phone;
5. connect your phone via USB port with a USB cable;
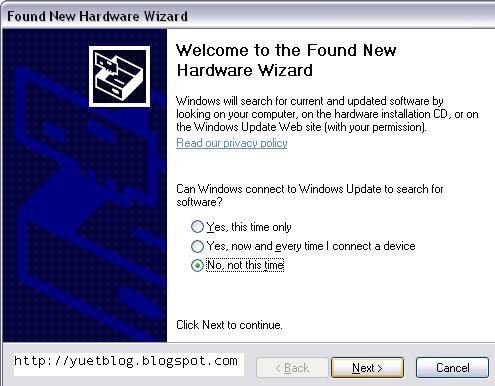
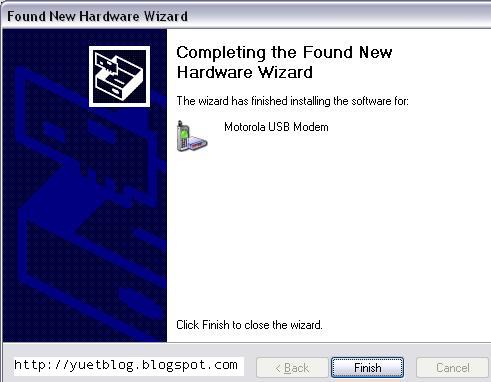
6. wait for a while, and the "Found New Hardware Wizard" will pop up;
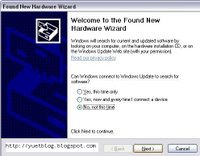

7. select "no, not this time" and click "Next";
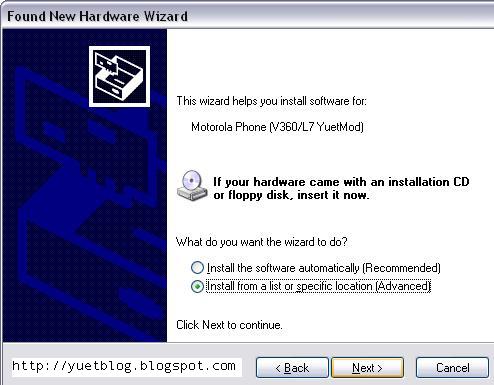
8. select "Install from a list or specific location (Advanced)" and click "Next";
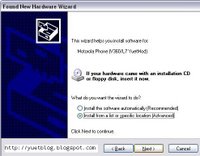

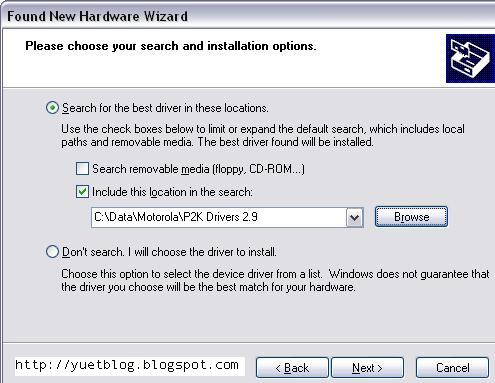
9. select "Search for the best driver in these locations", uncheck "Search removable media", check "Include this location in the search". then click "Browse" to select the folder where you put the driver .inf files. click "Next";
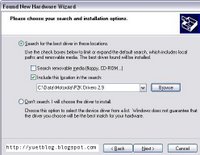

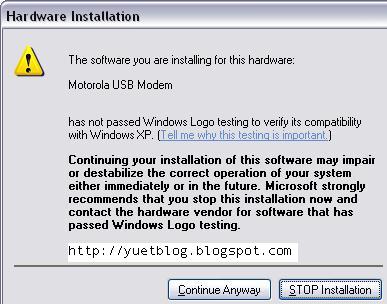
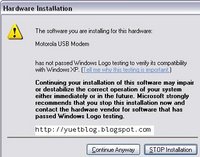
10. click "Continue anyway";

11. click "Finish";
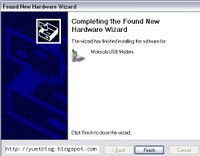

12. repeat steps 6-11 until WinXP complete installing all 5 devices/interfaces, namely, "motorola usb modem", "usb composite device", "motorola accessory interface", "Data logging MCU interface" and "Test command interface".
13. in P2KTools window, select "Switch to P2K Mode"; your phone will be detected;
14. click "Refresh" to update the folder/file tree of your phone;
15. Done. enjoy modding your phone.
(At the first time you use RSDLite to flash your phone, it will prompt you to install driver for "motorola flash interface". Just repeat steps 6-11 to install it.)

Update on 27/01/2007:
Motorola have released the driver installation packs for windows 32bit/64bit in December 2006. If the above driver installation procedure didn't work for you, you can use these driver installation packs to repair, reinstall, or remove all the motorola usb devices. Registry editing is not longer necessary.

Get them directly from Motodev. You have to sign up to download them. It is free. You will find the following drivers:

Motorola handset USB driver V2.6.2.0 for Windowns (64-bit) OS: for Windows 2000 or 32-bit Windows XP
Motorola handset USB driver V2.6.2.0 for Windowns (64-bit) OS: for Windows XP 64-bit or Windows Vista 64-bit

Supported Handsets
A630, A845, C380, C381p, C381/C386, C384/C385/C390/C391, C650/C651, C698p, E375, E398, E550/V535/V560, T725, V180/V185/V186/V188, V220/V220i/V226, MOTORAZR V3 (CLDC 1.0)/MOTORAZR V3b, V300/V400/V500, V330/V547/V551/V555, V303p/V400p, V540/V550/V545, V600, V600i, V620, V635, V80
C975, C980, E770, E1000/E1000R, E1070, MOTORAZR V3x, V975, V980
L2/L6/L6i, PEBL U6, MOTORAZR V3 (CLDC 1.1), MOTORAZR V3i/V3e/V3t, MOTOROKR E1, MOTOSLVR L7, V190/V191, V195/V196/V197, V230/V235, V360/V361, V365, V557/V557p
MOTORAZR maxx V6, MOTORAZR V3xx, V1100
MOTOKRZR K1, MOTORIZR Z3, MOTOSLVR L7i/L7e
A760/A760i, A768/A768i, A728
A780, A910, E680/E680i, MOTOMING A1200/A1200i/A1200r, MOTOROKR E6, MOTOROKR E2

Notes
You must have Administrator permissions to install this driver
Please reboot the system after installing this USB driver
Installation of Motorola’s Mobile Phone Tools may affect the performance of this driver. Please re-install the USB driver after the installation of the Motorola Mobile Phone Tools

Download:
motorola P2K driver 2.9: [inbrite.com] [filecloud]
P2KTools: [inbrite.com] [filecloud]

Sponsors links:

Friday, January 19, 2007

RSA Patch

RSA patch
for motorola flash neptune LTE2 phones
Well! Good day everybody. This is another milestone for moto modders. A trick was found to bypass CG1 RSA check on Flash Neptune LTE2 phones. Bypassing CG1 RSA check enables us to modify the CG1 flash. Open endless possibility for modders. Random has developed a tool "RandomRSA2" to patch code groups CG1, CG7 and CG18, so as to patch the RSA. Confirmed working on V360, L7, L6, and V3i.

Warning: not for newbies, don't try if you are not experienced modders.
Warning: It seems that this RSA patch does not work on phones with 09.02 bootloader.

Steps to patch RSA:

1. download & install RandomRSA2;

2. split firmware/monsterpack using RandomSHX or SHXCodec;

3. open CG1, CG7 and CG18 in RandomRSA2, then click "patch RSA" button;


4. (do whatever change you want in CG1, such as replace hellomoto splash picture, change firmware version, change system sounds, etc)
- replace bootscreen picture

5. use RandomSHX or Shxcodec to replace modified CG1, CG7, CG18 in the shx file, and compile a new shx MP.

6. flash the new shx using RSD Lite.

Download:
RandomRSA2: [4shared]
RandomSHX: [4shared]
SHXCodec: [4shared]

Sponsors links:

Thursday, January 18, 2007

How to install skins

How to put skins into motorola phones
I think this is one of the two most asked newbie's questions. Another is how to install java games & apps.

There are many ways to install skins. Here I show you two ways. The first is the tranditional and mac-friendly way, another way is using skiman.

Manually upload skins using P2KTools or Moto4lin
For example, you want to install a skin named "YuetMod". You have the YuetMod.ski file and a few .dat files, such as YuetMod.dat, YuetMod1.dat, YuetMod2.dat, etc.
1. start p2ktools or moto4lin, and connect your phone via USB;
2. update/refresh the phone files;
3. go to folder /c/mobile/skins, create the skin subfolder "YuetMod";
4. upload all skin files (YuetMod.ski, YuetMod.dat, etc) into the subfolder "YuetMod";
5. restart your phone, then you will see the new skin listed in skin menu.
(You should substitute "YuetMod" in the steps with the actual skin name that you want to install. The name must match the name of the .ski file.)
Upload wallpaper
1. you have to find out where to upload the wallpaper. Open the .ski file with a text editor, at near bottom of the file you will see a line starting with "6 1015". (for example, 6 1015 /a/mobile/picture/wp_moto_176x220_c.jpg) This is the location of the wallpaper file.
2. use p2ktools or moto4lin to upload the wallpaper to that location.

Install skins using skiman
1. start skiman, and connect your phone via USB;
2. the program will read your phone and display a list of skins installed in your phone;
3. click the "Install" button;
4. a "SKI patches" window will popup. You can try the option provided, but if you are not sure, just "clear selection" and click "OK" button;
5. select the .SKI file to install; (For example, YuetMod.ski) click "Open" button;
6. wait until the program finish uploading files to your phone;
7. click "More..." button, and select "Restart phone".
8. you will see the new skin listed in skin menu.

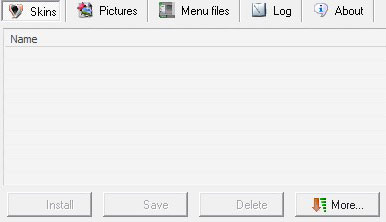
a screenshot of skiman:


Download skiman: [4shared]

Sponsors links:

Tuesday, January 16, 2007

Websession for motorola phone

Websession files for motorola cell phone
It is quite tedious to set up websession every time you flash your phone. I pack this websession package, so you can just download the websession file and upload to your phone. Please send your websession file to me if you want to share it.

Steps to install & set up the websession file:

1. download the zip file and unzip the websession that match you country and carrier; Rename the file to "websession" if it is other name;

2. use p2ktools or moto4line to upload the websession file to /a/websession in your phone;

3. on your phone, go to "Messages", press MENU key and select "setup" - "MMS setup", select "Server Info". Press MENU key and select "Edit" to edit "current server". Put in the URL of MMS server and select the proper MMS websession.

Pack1 contains:
Australia-Telstra.Vodafone.Optus.zip
Brazil-TIM.zip
Canada-Rogers.zip
China-Chinamobile.zip
Germany-Vodafone.zip
Greece-Vodafone.zip
Malaysia-Maxis.zip
Mexico-Movistar.rar
Mexico-Telcel.rar
Phillipines-myGlobe-Smart-Sun.zip
Poland-Era.zip
Singapore-M1-Starhub-Singtel.zip
Thailand-AIS-DCAT-Orange.rar
UK-O2.rar.txt
UK-Orange.zip
UK-T-Mobile.zip
UK-Tesco.zip
UK-Vodafone.zip
US-Cingular.zip
US-T-Mobile.zip

Added
Greece_Cosmote_WebSession, from REY
Argentina-Personal-WebSession, from Nacho
Romania_Orange_websession, from Stefan
Spain_Movistar_WebSession, from Javi
HongKong_all_providers
Malaysia_all_providers
WebSession-NewZealand-Vodafon, from jaejae
WebSession-Romanian-all-providers, from Metallus

Download:
Websession-pack1.zip: [inbrite.com]
Greece_Cosmote_WebSession: [inbrite.com]
Argentina-Personal-WebSession: [inbrite.com]
Romania_Orange_websession: [inbrite.com]
Spain_Movistar_WebSession: [inbrite.com]
HongKong-3DB-1010-NewWorld-SmarTone-Peoples-Sunday-CTM-HutchPlus-WebSession: [inbrite.com]
Malaysia-Celcom-DiGi-Maxis-WebSessionl: [inbrite.com]
WebSession-NewZealand-Vodafon: [inbrite.com]
WebSession-Romanian-all-providers: [inbrite.com]

Sponsors links:

Sunday, January 14, 2007

LP Guide - part 2 - Change Language

How to extract/add/delete languages in/from Language pack
Continue from LP Guide - part 1.

This part will show you how to extract/add/delete languages in/from Language pack. A langpack usually contains English and some other languages. You can use the langpack editor in SHXCodec to save each language as lng file, and you can add/delete languages in/from the langpack. Follow this guide, you will be able to create a customised LP for yourself, with only the languages you want, without those that you don't want. One thing you should bear in mind is that the langpack has limit in size (about 2MB), so you can put too many languages in one langpack.

Extract/add/delete language from/to LP
1. start SHXCodec, select menu "Utilities" then "LangPack Editor";
2. in the LangPack Editor, click "Open langpack" to open the LangPack SMG file as "Source LangPack file";
3. click "Parse language" button, a list of languages in the LP will be shown under "Languages";
4. To extract language, select the language which you want to extract and click "Save language" to save it as a lng file;
5. To delete language, select the language and click "Delete";
6. To add language, select "Add from file" button, then select the lng language file;
7. After you have completed the change in the langpack, click "Save langpack" button to save the LP in SMG format;
8. follow part 1 guide "Compile a LangPack reflash file using the SMG file" to compile the LP reflash file.

screenshot of LP editor in SHXCodec:


In next part, I will show you how to change text in the language.

Sponsors links:

Saturday, January 13, 2007

LP Guide - part 1 - Extract LP

How to extract LangPack from phone or MonsterPack
This post will show you how to extract the language pack as binary file from your phone or monsterpack, and how to make it a flashable LP reflash file.

Tools you need:
1. Flash&backup 3
2. SHXCodec 2.6

Backup language pack from your phone
Follow these steps:
1. Start Flash&Backup 3;
2. select "Read data" tab;
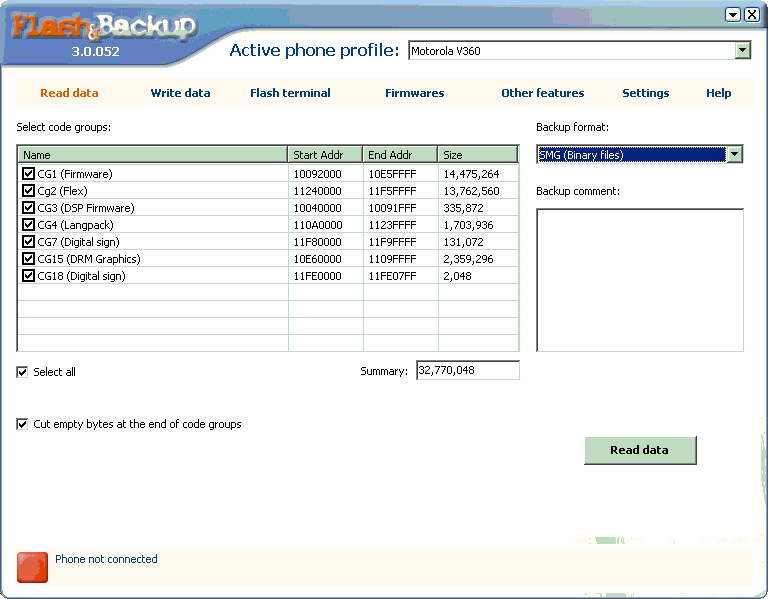
3. select "Active phone profile" that match your phone model, such as "motorola V360" or "motorola L7";
4. select SMG as "Backup format";
5. select ONLY code group 4 (CG4) to backup; (CG4 is the LangPack)
6. check "cut empty bytes at the end of code groups"
7. click "Read data" button;
8. wait for a few minutes, you will get the SMG file, which is the binary file of the Language pack in your phone.

screenshot of flash&backup 3:


Read more about flashbackup 3 at [flashbackup 3].

Extract language pack from MP
Follow these steps:
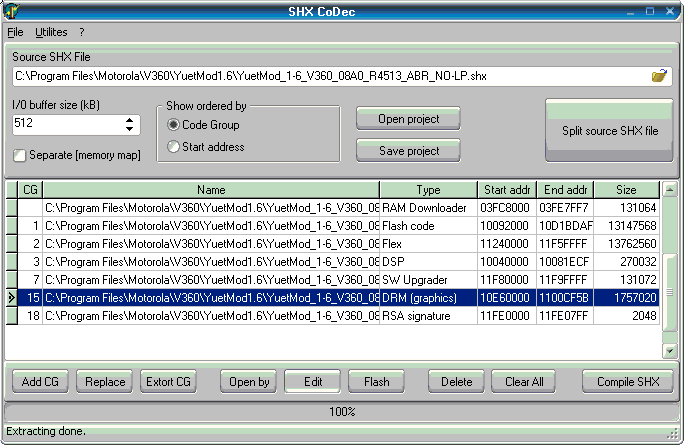
1_ start SHXCodec and open the SHX monsterpack file. (please make sure the MP or the LP is suitable for your phone.)
2. select "Split source SHX file", the MP file will be split into many code groups (CG);
3. select CG4, which is the language pack, then click "Edit" button; The Language editor is shown;
4. click "Save langpack", and save the langpack as a SMG file.

Compile a LangPack reflash file using the SMG file
Follow these steps: (For bootloader 08.A0 or lower only. Guide for compiling LP for higher version of bootloader will be available later.)
1. start SHXCodec, and open an existing LP reflash file for your phone;
2. select "Split source SHX file";
3. select CG4, then click "Replace" button; then select the SMG file that you extracted;
4. rename the "Source SHX File", and click "Compile SHX" to compile the LP reflash file. Now you can use RSDLite to flash the compiled LP file to your phone.

How to install LangPack to your phone?
To install language pack, you need to flash the LP reflash file (a SHX file) to your phone, as how you flash a MonsterPack. Here is the "how to flash" guide.

screenshot of SHXCodec:


screenshot of LP editor in SHXCodec:


(Screenshots are just for your reference. They do not follow the actual steps.)

Sponsors links:

Tuesday, December 19, 2006

Transfer files from computer to phone

How to Transfer files from computer to motorola p2k cell phone
I saw this question was quite frequently asked in forums, so I think I should write this post. There are a few ways you can transfer files, such as MP3 or pictures, to your phone.

transfer to memory card
If you have a Trans-flash (TF) card in your phone, you can connect your phone as a removable drive, and copy the files to the folder in the card. Before you connect your phone via usb, you need to select "Memory card" in menu "Connection - USB setting".

transfer via bluetooth
If you have bluetooth in your phone and your computer, you can set up your phone as a bluetooth device in the computer, then use bluetooth to transfer files to your phone. Don't forget to power on the bluetooth on your phone. For Mac users, I have written the following guides.
Set up bluetooth phone on Mac, and
Make your phone a bluetooth hard disk

transfer via p2k software
To use P2K software, you have to first install p2k driver and the p2k software, such as P2KTools. After that, select "Data/Fax mode" in menu "Connection - USB setting", and connect your phone via USB. Your phone should be detected by p2k tools. P2KTools can browse the file system in your phone, and upload/download files to/from your computer.

Download
P2KTools: [4shared] [filecloud] [mofile]

Sponsors links:

Saturday, October 07, 2006

Hex Edit Guide - part 5

Hex Edit Guide
part 5
Continue from [Hex Edit guide part 1] , [part 2], [part 3] & [part 4].

This part covers:
- simple edit of mma_ucp file.

simple edit of mma_ucp

Following this guide, you can replace an existing unused menu item with a new menu item, or swap the position of two existing menu items. In the following steps, I will show you how to swap the position of "Shortcuts" and "RecentCall".

Steps:

1. use P2K software to download the mma_ucp file. The file is in /a/mobile/system/. Please make a backup of the file.

2. open the file using Hex editor.

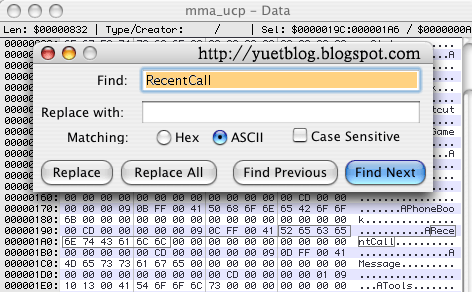
3. search for text "RecentCall".


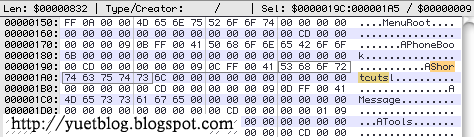
4. replace text "RecentCall" with "Shortcuts".


5. as "RecentCall" is one character longer than "Shortcuts", you must replace the hex value "6C" of the last character "l" with "00".


6. search for another appearance of "Shortcuts", then replace it with "RecentCall".

7. save the file, then upload it to /a/mobile/system

8. restart your phone to see the change.

Sponsors links:

Wednesday, October 04, 2006

Skin edit trick - caller photo

Skin edit trick
Adjust coordinate of caller photo
I think this trick is already well known. You can edit the skin .SKI file to adjust the dimension/coordinate of the displayed caller photo when there is incoming calls.

Tools you need:
TextWrangler for Mac or UltraEdit for PC

Steps

1. download the .ski file (i.e. moto.ski) from your phone to your computer.

2. make a backup of the file, then open it using the text editor (TextWrangler or UltraEdit).

3. in the ski file, look for the 4 lines similar to the followings.
1 478 2 82 173 107
1 479 48 113 127 192
1 480 2 108 173 197
1 481 5 84 170 105

explanation
- The first 2 columns (i.e. 1 478) are the ID of the items, so you must not change them. The 3rd to 6th columns define the coordinate of the item. 3rd & 4th define the top-left corner of the rectangle, while 5th & 6th define the bottom-right corner.
- 1st line (1 478) defines the coordinates of the background of caller title
- 2nd line (1 479) defines the coordinates of the photo of the caller
- 3rd line (1 480) defines the coordinates of the background of caller photo
- 4th line (1 481) defines the coordinates of the title of the caller

4. you can adjust the coordinates to whatever you want. The following setting is just for your reference. This setting is used in the skins of my YuetMod MPs. Try it to see the difference. It will display big caller photo. You may need to adjust them to fit your skin.

1 478 2 17 173 37
1 479 4 37 170 196
1 480 2 37 173 197
1 481 5 17 170 36

5. after you have changed the coordinates, save the ski file and upload it back to your phone. It is done!

Sponsors links:

Sunday, September 17, 2006

Road to extreme modder

Road to extreme modder
from newbie to MP maker
My intention is to write a complete guide for moto modding. If you have any topics you want to add in this guide or anything to contribute, please let me know.

Table of contents: (More guides will be added as and when.)

level 1: install driver & p2k software, backup & flash

level 2: understand p2k file system, simple mods, install skins

level 3: modify/create skins

level 4: seem edit, mods with seem edit

level 5: hex edit, mods with hex edit

level 6: DRM modding

level 7: LangPack modding

level 8: understand SHX file, compile MP.

level 9: advance topics - RSA Patch, CG1 hacking, SHX header, bootloader ...

Other topical guides for moto modding:

Sponsors links:

yuetblog.blogspot.com Web