Messages: Please use the inbrite.com forum for our discussions & Q&A.

News: It is reported that iTunes 9 is compatible with jailbroked iPhones... Now I got an iPhone 3GS. I will be posting something about it...

Sponsors links:

Tuesday, September 04, 2007

How to revive your phone - scenario 7

How to revive your phone - scenario 7
This is a case reported by spock in inbrite.com forum.

Scenario 7: You testpointed your phone, and you could repair PDS successfully, but you couldn't flash a MP successfully, by all means.

Solution: This is what spock had when the phone was dead.
1. I could testpoint and do PDS repair and BL load.
2. None of the MP/supfiles i tried worked, i even tried some RFDIs.
3. RSDLite and P2KE were all giving errors, see above for the full story.
4. Trying all the solutions given in the 'How to revive your dead mobile' did not bring my mobile back to life.
Solution that worked for spock:
Again this forum was indispensable for finding the solution.
I knew that i had corruption somewhere in the phone memory so i wanted to erase everything and start from new, however the ERASE function would not work through RSDLite or P2KE or RMLDR.
In this thread yuetblog.blogspot.com/...30050.html there is a section about FB3 (partly reproduced below):
------------------------------------------
[FB3 Profile]
ID=R4513_V360_08A0
Model=Motorola V360 (With 08.A0 boot)
UseLdr=1
RamDld=V360 (08A0).ldr
Addr=03FC8000
Jump=03FC8010
------------------------------------------
Great, this gave me the address i needed to load RAMDLD through FB3.
So I fired up FB3, went into 'Flash terminal' press 'Send RAMDLD', selected the appropriate V360 08a0 loader and it loaded fine.
Next I pressed 'Erase memory' on everything except the PDS and BL, because i knew these were ok from previous investigations. That is erase areas 10092000-11FeFFFF. Now the Erase actually worked. I knew i was making progress.
Now I testpointed again and did Repair PDS in P2KE, testpointed again and loaded a stock MP, i selected this file:R4513_G_08.B7.ABR_PDS016_LP0039_DRM0101_JPJAVA_G_08_V360_06_03_01R_SE4877AXXE112B_1FF.shx.
To my astonishment everything started loading fine, however the phone did not actually reboot at this stage, but RSDLite now showed all the phone information in the 'Device Properties' that was previously always misssing; including the correct IMEI.
Next I loaded Yuet v1.9a MP, and hooray, SUCCESS, at last.

Related artical: how to revive your phone - other scenario

Sponsors links:

Wednesday, August 01, 2007

Downgrade 09.02 bootloader

Downgrade 09.02 bootloader for V360/L7
Hi everybody, Bullfrog told me this good news today. We can use these steps to download the 09.02 bootloader.

1) Flash with the L7e font with FB3 and wait the "close" inscription.
2) Remove cable and batt.
3) Open P2K_Easy_Tool_v39, select model phone and go to "Repair"> "Full repair PDS zone".
4) Connect the cable without battery and press "Do selected job" then "OK".
5) Disconnect phone, and open ramldr2_0.31, put the battery, and in the display may appears bootloader "08.A0" (v360); if not, with ramldr2_0.31 we press "Send loader", then Write BOOT and choose the bootloader corresponding to phone:
V360 - 08. A0
L7 - 08. D0
6) Close the program.
7) Open Flash Backup or another flash program and we flash with any firmware, o any MP we want.

Original Tutorial:
Mr_Mutabor

Collaborators:
Flex4, dvsdigiman

Translate:
Bull

Download the flash file, bootloader and this tutorial: [inbrite.com]

Sponsors links:

Tuesday, July 24, 2007

Motorola iTunes hacking revealed

Motorola iTunes hacking revealed
Guides written by Warp
Warp is writing a series of guides on this topic - Motorola iTunes hacking. The guides are published in www.inbrite.com forum.

Part 1:

In this part, Warp gives an introduction to all the stock version of Motorola iTunes. Read more at Motorola iTunes hacking revealed #1.

Part 2:

In part 2, Warp talks about Java disassemblers and decompilers, and show us the related codes about the iTunes protection of song limit. Read more at Motorola iTunes hacking revealed #2.

Part 3:

In part 3, Warp shows us how to break the 400 songs limit. Read more at Motorola iTunes hacking revealed #3.

Part 4:

Warp gives us the final cracking solution and the iTunes translation script. Read more at Motorola iTunes hacking revealed #4.

Sponsors links:

Tuesday, July 10, 2007

Make MPs compatible with sticky firmwares

Make your MPs compatible with sticky firmwares AER/E0R
Russian hackers announced a great CG1 patch. With this patch, you can make your MPs also compatible with phones with AER/E0R. You don't need to get rid of the sticky firmware any more.

This patch was brought to me by coccolino_dbro. He has tried it on his V360 successfully. I also tried. I flashed to AER, then I can flash successfully to my newly created YuetMod v1.9a MP, which is based on ABR.

Use V360 ABR as an example, you can follow these steps to apply the patch to your MP.
(Assume you already know how to apply RSA patch and compile MP.)
1. split/extract your MP, which has RSA protection removed.
2. use XVI32 to open the CG1 file.
3. press Ctrl + G and jump to hex offset 386A8.
4. replace the Hex values from 477846C0 to 20014770.
5. press Ctrl + G and jump to hex offset A373D8.
6. replace the Hex values from 477846C0 to 20014770.
7. save CG1, then compile a new MP.

Different firmwares have different offsets, please refer to the following patch codes for your firmware version:

V360 ABR: (provided by coccolino_dbro)

[Patch_Code]
000386A8: 20014770
00A373D8: 20014770

[Patch_Undo]
000386A8: 477846C0
00A373D8: 477846C0


===================
V360 ACR: (provided by coccolino_dbro)

[Patch_Code]
000386DC: 20014770
00A37A08: 20014770

[Patch_Undo]
000386DC: 477846C0
00A37A08: 477846C0


===================
L7 ACR_RB:

[Patch_Code]
000386DC: 20014770
00A37A08: 20014770

[Patch_Undo]
000386DC: 477846C0
00A37A08: 477846C0

===================

Discussion thread in www.inbrite.com.

Sponsors links:

Tuesday, July 03, 2007

Fix checksum errors in MP

Ultimate way to fix checksum errors in MP
This is the method I always used to fix the checksum errors in the MP.

Tools you need:
1. RSD Lite
2. RandomSHX
3. HexEditor

Steps:

1. flash the MP with checksum errors, using RSDLite.

2. open the FlashErrorLog1.log file in RSDLite folder, look for checksum errors similar to those in the attached image in the forum. The file checksum is the one in your file, which is wrong. The phone checksum is the correct one.

3. use RandomSHX to extract your MP into bins.

4. open the 0.bin file using hex editor.

5. search for the file checksum. You need to swap the bytes. For example, if the file checksum is 0x8D8A, you should search for 8A8D in the hex editor.

6. replace the file checksum with phone checksum. You also need to swap the bytes. For example, if the phone checksum is 0x8C39, you should replace the file checksum with 398C.

7. repeat steps 5-6 until you fix all the checksum errors in the log.

8. save the 0.bin file and compile the MP using RandomSHX.

Discussion thread in inbrite.com forum

Sponsors links:

Friday, June 29, 2007

YuetPhoto - mobile photo album & slide show

YuetPhoto
mobile photo album & slide show

I wrote this mobile photo viewer in Nov 2005. I still want to add more features to it, but I have not time to finish them. Now I'd like to package this v0.1 version for you to at least have the slide show features on your mobile phone. It is ideal for creating mobile java photo albums, and distribute it on internet. It is tested on both motorola V360 and E398. It should work on any mobile phone which supports MIDP2.0, including cell phones by Nokia, Sony Erission, Samsung, etc.

Features at a glance:
- photo slide show
- view photos in full screen
- auto rotate photos to fit the screen
- English & Chinese interface, switch language instantly. It is possible to add other language, if you would like to help.
- view photos stored in jar file
- support png, gif and jpg format
- options to set slideshow speed and number of loop.

Usage:
8/2=next/previous page
*=back to photo list

Command Menu in photo list screen:
1.Option
2.Slideshow
3.Language
4.About this midlet
5.exit

How to create java photo album?
- prepare photos that fit the screen size of your mobile phone.
- Download and unzip the midlet jar file into a dedicated folder.
- Name each photo as photo1.jpg, photo2.jpg, photo3.jpg and so on. For png or gif file, just replace the extension jpg with png or gif.
- Put all the text files into photos/jpg, photos/png and photos/gif in the dedicated folder, according to the file format.
- Change following parameters in the META-INF\MANIFEST.MF file:
1. MIDlet-Name:
2. Album_name:
3. Album_desc:
4. png_count:
5. gif_count:
6. jpg_count:
- Save the file and zip everything in the folder (not including the folder) and rename the extension from zip to jar.
- Install the jar file in your mobile phone.
- For Windows users, you can use Winzip or any other zip program to zip/unzip the file.
- for Mac users, use "stuffit expander" to unzip the jar file and use the archive function to zip the files.

Why use YuetPhoto v0.1?
- Everything is in one single jar file, makes it very easy to distribute your photo albums.
- It is compliant to MIDP 2.0, so it should work on any mobile phone with MIDP2.0 support.
- No special permission is required to run this midlet.

You can distribute your java photo albums using this midlet for noncommercial purpose. If you want to use this midlet for commercial purpose, contact me please.

Support/Feedback at this thread in inbrite.com.

Download YuetPhoto 0.1.0: [inbrite.com]

A sample photo album powered by YuetPhoto:
Keira Knightley: [inbrite.com]
Jessica Alba (by Shag_o_mac): [inbrite.com]

Sponsors links:

Saturday, June 23, 2007

Create skins with animated wallpaper

How to create skins with animated wallpaper
Here are the steps to make animated wallpaper for your skin.

Tool you need:
Skinner4moto

Steps

1. Prepare an animated gif file, the size of the image must be 176x220 or smaller. Name it 573.gif;

2. download skinner4moto;

3. start skinner4moto and open your skin;

4. copy the animated gif file "573.gif" into the gifs folder, which skinner4moto created after openning the skin with this name 573.gif;

5. go to Location/Size and look for ID 572, set the values of the upper-left coordinate of your gif file in "Left" and "Up" input boxes, and set the Width and Height of the gif in "Width" & "Height" input boxes;

6. go to "Yes/No Booleans" and set the ID 599 to true to enable the ID 599;

7. save the skin.

Discussion thread in inbrite forum.

Download skinner4moto: [inbrite.com];

Sponsors links:

Wednesday, June 06, 2007

How to improve network reception

How to improve network reception
We found some firmwares have better reception than others. This is a guide show you how to import the network signal settings from one firmware to another. I haven't verified the effectiveness of this method, as I live in a city where cell phone reception is good everywhere. If you experience bad reception, you may want to try these steps.

Tool you need:
Radiocomm

Steps:

1. flash your phone to a MP which has better reception;

2. connect your phone to computer via USB;

3. start Radiocomm, select menu "Features", then "NV / SEEM";

4. select the option, as shown in the screeshot, for the fields "Product", "Command Type", "Options", "Read Options" and "Compare to File".

Radiocomm screenshot

5. click action "Read";

6. after reading, click "Save" and save as a NVM file; close Radiocomm;

7. flash your phone to the MP with worse reception;

8. connect your phone to computer via USB;

9. start Radiocomm, select menu "Features", then "NV / SEEM";

10. select the option, as shown in the screeshot, for the fields "Product", "Command Type", "Options", "Read Options" and "Compare to File".

Radiocomm screenshot

11. click "Open", then select the NVM file you saved in step 6;

12. after opening, click action "Write"; close Radiocomm;

13. now the phone should have better reception.

Please try it and let me know how effective this method is. Please provide your feedback at the thread in inbrite.com forum.

Sponsors links:

Wednesday, May 23, 2007

"Airplane Mode" in initial setup???

Fake "Airplane Mode" in initial setup
As suggested by .::Rey::., I would like to write this warning about the "Airplane Mode" in initial setup.

What I am talking about is the CG1 hack that enable the option "Airplane mode" in the "initial setup" of V360/L7. I tried this CG1 patch, but I don't think it is true airplane mode, and even it is not airplane mode at all.

The hack is a trick. It patches the original "Status light" option to make it an option that can turn your phone into "No service" state. In this state, you can't make/receive calls, can't send/receive SMS, can't use GPRS, but you can still use bluetooth, and you can still try to make call, send SMS and start browser, although it will fail.

I doubt this trick will actually stop sending signal/searching network. I hope the original hacker can tell us the theory behind it. We can achieve the same "No service" state if we choose a wrong band in network setting.

When the real airplane mode (the one in Yuetmod v2.x) is on, it will show "Airplane mode is on" instead of "No service". It will shut off all the wireless signal for GSM, GPRS & Bluetooth network. It will also disable all the functions in the menu that might activate any of the wireless signal. The main purpose is to avoid interference with Global Positioning system during airplane flight. It can be used in other area where cell phone signal is restricted, such as hospital.

I think we must take this "airplane mode" function seriously, as the fake "airplane mode" can cause fatal problem if you use it in the flight or the hospital.

Sponsors links:

Tuesday, May 22, 2007

Delete iTap from language pack

How to delete iTap from langpack
If you prefer the tranditional Tap input instead of iTap, you can delete iTap from the langpack using the Delete_iTap software.

Steps:

Part 1: for 08.A0/08.A2 bootloader

1. Start SHXcodec and open the LP SHX file.

2. Click "Split source SHX file". Don't close SHXCodec.

3. Start Delete_iTap program, click "Open CG" to open the code group (CG4) smg file of the langpack, which you extracted using SHXCodec in step 2;

4. Choose the language by clicking the check boxes, then click "Delete all chosen iTaps" from the selected languages. Click "Yes" to confirm.

5. Download the 08.A0 RAMDOWNLOADER.

6. in SHXCodec, click in the line which says ramdownloader, and select "replace". Replace it with the 08.A0 ramdownloader.

7. compile the langpack to get an updated SHX file. Flash the SHX to your phone to see the effect.

Part 2: for 08.D0/09.02 bootloader

1. Start RandomSHX and open the LP SHX file.

2. Click "Extract BIN files from SHX". Close RandomSHX.

3. Start Delete_iTap program, click "Open CG" to open the code group bin file of the langpack, which you extracted using RandomSHX in step 2; You can try if you are not sure which bin file is the LP. The Delete_iTap program will show an error when you open a wrong bin file.

4. Choose the language by clicking the check boxes, then click "Delete all chosen iTaps" from the selected languages. Click "Yes" to confirm.

5. Start RandomSHX, click "Create SHX file from BINs", then select the lst file, which you extracted in step 2. You will get an updated SHX file. Flash the SHX to your phone to see the effect.

Download:
RandomSHX: [inbrite.com]
SHXCodec: [inbrite.com]
Delete_iTap: [inbrite.com]
08.A0 RamDownloader: [inbrite.com]

Sponsors links:

Monday, May 21, 2007

wolf2007 MP

wolf2007 MP 1.1 for V360
MP maker: coccolino_dbro

This is another awesome MP by coccolino_dbro. A real monster!

Check out the details and download at inbrite.com forum.

Sponsors links:

Thursday, May 17, 2007

How to flash V360 with 08.A2 bootloader

How to prepare flash file for V360 with 08.A2 bootloader
This post is based on the post by bullfrog in inbrite.com forum. All credits to bullfrog.

The boot 08.A2 is not so complicated. Just make the idea you have an 08.A0 boot and that's it. You get error when flashing, because most of the shx files (v360) are compiled to work with 08.A0 and 08.D0 bootloaders, but indeed they are compiled with a 08.D0 ramdownloader and bootloader 08.A2 doesn't allow flash with that ramdownloader.

To make any shx (MP/LP/DRM) work with your bootloader you have to recompile the flash file with an 08.A0 ramdownloader. When you are going to flash, open the file with rsd lite and put atention in the right screen of the program, there it says the ramdownloader version of he shx, if says 08.D0, the file will not work for 08.A2 phone, if says 08.A0 it's ok.

Compatibility table between Bootloader and Ramdownloader (v360):

Bootloader 08.A0: You can use ram A0 or D0.
Bootloader 08.A2: You can use A0.
Bootloader 08.D0: You can use D0.
Bootloader 09.02: You can use D0 (If the flash has a firmware without RSA protection will not work)

How to compile any shx to 08.A2 boot?

You will need shxcodec

1) Download the 08.A0 RAMDOWNLOADER.
2) Open the shx with shxcodec and click "split".
3) Then you click in the line which says ramdownloader, and select "replace". Replace it with the 08.A0 ramdownloader you got in step 1.
4) Then compile the shx, you give a name and wait for the file creation.
5) Flash with your new SHX (Just check if says 08.A0 in the rsd lite)

(In the future I will not make seperate flash file for 08.A2 bootloader. Please always follow the steps in this post to convert the 08.D0 flash file to 08.A0.)

Sponsors links:

Wednesday, April 25, 2007

How to revive your phone

A summary on how to revive V360/L7 from software errors
I just revived my phone from a quite severe condition. My phone was detected "unknown device" & "USB device malfunctioned" by Windows. I have to testpoint the phone to bring it to life again. (It is not free, I spent $10 for the torx screw drivers set.) I think I have bricked my phone for enough times, so I would like to write this summary for reviving the phone from different scenarios. This summary is based on my experience with my V360. I think it should also apply for L7 (08.D0 R4513) as well.

Scenario & solution

Scenario 1: Once power on, the phone is always in bootloader mode showing "Code corrupted", "RDL SIG ERR" or "PH SIG ERR".
Solution: Flash your phone again to a compatible and working Monster pack (MP) using RSD Lite.

Scenario 2: Once power on, the phone is always in bootloader mode showing "MEM_MAP BLANK" or other errors. You can't flash any MP using RSD Lite.
Solution: Flash your phone again to a compatible and working MP using P2K Easy Tool v3.9.

Scenario 3: You can't power on your phone. It stays in the black screen. Your phone is not detected by RSD Lite.
Solution: Take off battery, press & hold * and # keys, then put back battery. If the phone can go into bootloader screen, flash to a compatible and working MP using P2K Easy Tool v3.9.

Scenario 4: The phone boots into a white screen. It is not detected by RSD Lite.
Solution: Take off battery, press & hold * and # keys, then put back battery. If the phone can go into bootloader screen, flash to a compatible and working MP using P2K Easy Tool v3.9.

Scenario 5: You can't power on your phone. It stays in the black screen. Your phone is not detected by RSD Lite. It is detected "unknown device" & "USB device malfunctioned" by Windows. You can't get into bootloader mode by all means.
Solution: Steps:
1) testpoint your phone to get it detected as s blank neptune LTE2, then release the testpoint;
2) use P2K easy tool v3.9 to repair PDS;
3) testpoint your phone again to get it detected as s blank neptune LTE2, then release the testpoint;
4) flash to a compatible and working MP using P2K Easy Tool v3.9.

Scenario 6: You can't power on your phone. It stays in the black screen. Your phone is detected as "S Blank Neptune LTE2" by RSD Lite.
Solution: Repair "S Blank Neptune LTE2".

Let me know your solution if you have encountered other scenario.

Sponsors links:

Forum & Community

The forum is ready, & Romanian Blog is under construction
As suggested by many of you, I have created a community forum to make it easier for our discussions, Q&A, sharing of knowledge and having a lot of fun!

The forum is at inbrite.com.

Furthermore, the Romanian blog is at yuetblogro.blogspot.com is created. Metallus, Coccolino_dbro and their friends will help to translate all English Yuet Blog articles to Romanian in this Blog. Let's support them, my Romanian friends! Send me an email if you also want to take part in this project.

Wish all the translators good luck and let's have a lot of fun!

Sponsors links:

Wednesday, April 18, 2007

Bit manipulation using opcodes

How to update a bit using opcode
This guide will show you how to manipulate bits in SEEM. Before you read on, you must have already read this guide about motorola opcode. As you can see from the "motorola opcode" guide, we can only read/write bytes, but not bits. We have to do some calculation, in order to change only the bits we want to change.

I think the best way to explain it is by example. Let's say we want to do the following seem edit:

option to switch storage device (discovered by Yuet)
SEEM 0032-0001 offset 9F bit 3:
on = switch to phone memory/memory card directly in list, java apps will be installed in card when "install new apps"
off = press menu key to see "switch storage device" option, will prompt to select storage device when "install new apps"

Steps:

1. to get the value of the offset 9F in SEEM 0032-0001, we use the following opcode:
32*50*1*159*1

2. The value we get is "c8", which is a hex value. It is 200 in dec value. We try to decode "200" using this formula:
200 = bit0 x 1 + bit1 x 2 + bit2 x 4 + bit3 x 8 + bit4 x 16 + bit5 x 32 + bit6 x 64 + bit7 x 128

What we get is:
200 = 0 x 1 + 0 x 2 + 0 x 4 + 1 x 8 + 0 x 16 + 0 x 32 + 1 x 64 + 1 x 128

so we can see in this offset, bit 3, 6 & 7 are on. In this example, we want to turn off bit 3 to enable the "switch storage device" option, so we change value of bit3 to 0 in the formula. We get:
0 x 1 + 0 x 2 + 0 x 4 + 0 x 8 + 0 x 16 + 0 x 32 + 1 x 64 + 1 x 128 = 192

192 is the value we are going to write to the offset 9F.

3. We write the value 192 to offset 9F in SEEM 0032-0001 using the following opcode:
47*50*1*159*1*192

4. Reboot the phone using opcode 34, and it is done.

Sponsors links:

Sunday, April 08, 2007

Useful opcodes

Useful opcodes
In this post I will write down those opcodes which I find useful. To understand motorola opcode, please read my guide - Motorola Opcode.

Legend:
[menu] = Menu key
[OK] = Right soft key "OK"

Before you can key in opcodes:
You must key "[menu] 0 4 8 2 6 3 *" at home screen to enter opcode screen first.

After the opcodes are executed:
If you updated the seem using opcode, you should key "34 [OK]" in opcode screen to restart the phone.

The followings are the opcodes:

Change Camera Key
to Voice Key: 47*91*1*31*1*043 [OK]
to Camera Key: 47*91*1*31*1*063 [OK]

Change Headset Key
to original headset key: 47*91*1*51*1*051
to Right key: 47*91*1*51*1*047

Change Video format
to 3gp: 47*74*1*465*1*001 [OK]
to mp4: 47*74*1*465*1*003 [OK]

Swap to ring style when press & hold # key
to soft: 47*74*1*493*1*001 [OK]
to vibrate: 47*74*1*493*1*002 [OK]
to vibe then ring: 47*74*1*493*1*003 [OK]
to silent: 47*74*1*493*1*004 [OK]
to vibe & ring: 47*74*1*493*1*005 [OK]

USB charging option
enable: 47*74*1*519*1*001 [OK]
disable: 47*74*1*519*1*000 [OK]

Sponsors links:

Tuesday, April 03, 2007

Motorola Opcode

Understand Motorola Opcode
Like many of you, I was not paying much attention to the motorola opcodes, until recently I find the opcodes can be quite handy. This post will show you how to use the motorola opcodes. It is not that difficult if you know how to convert between Decimal (Dec) & Hexadecimal (Hex) values. Opcodes can be used to read & write SEEM, and restart phone, using your phone instead of the computer.

Legend:
[menu] = Menu key
[OK] = Right soft key "OK"

To get to the OpCode screen, press the following keys in sequence & quickly:
[menu] 0 4 8 2 6 3 *

If you can't get the OpCode screen, maybe it is not enabled in your phone. To enable Opcode Menu, do the following seem edit: (don't know seem edit? read this guide.)
SEEM 0032 offset 36 bit 4: (set on)

How to enter opcodes:
1. key "[menu] 0 4 8 2 6 3 *" to enter opcode screen
2. key opcode string, such as 32*91*1*31*1
3. press right soft key [OK]

Major Opcodes:
32 - read seem
47 - write seem
34 - restart

Opcode Syntax:

Restart phone:
34 [OK]

Read seem:
[Opcode]*[field1]*[field2]*[field3]*[field4]

Example: 32*91*1*31*1
Explanation:
This opcode reads Hex value from offset 1F in SEEM 0005B-0001.
[Opcode] 32 = SEEM reading opcode
[field1] 91 = seem ID in Dec value. (91 is 005B, 50 is 0032)
[field2] 1 = seem record number in Dec value. (1 = 0001, 10 = 000A)
[field3] 31 = offset in Dec value. (31 = offset 1F)
[field4] 1 = number of bytes to read (1 means reading only offset 2F, 2 means reading offsets 2F & 30, etc.) If you put 0 for both field3 & field4, it will read all offsets in the seem record.

Write seem:
[Opcode]*[field1]*[field2]*[field3]*[field4]*[field5]

Example: 47*91*1*31*1*043
Explanation:
This opcode writes Hex value 2B to offset 1F in SEEM 0005B-0001.
[Opcode] 47 = SEEM writing opcode
[field1] 91 = seem ID in Dec value. (91 is 005B, 50 is 0032)
[field2] 1 = seem record number in Dec value. (1 = 0001, 10 = 000A)
[field3] 31 = offset in Dec value. (31 = offset 1F)
[field4] 1 = number of bytes to read (1 means reading only offset 2F, 2 means reading offsets 2F & 30, etc.)
[field5] 043 = value to write in Dec value, must be block of 3 digit. If you put 2 for field4, you should put 2 blocks in this field. For example, 043043 (043 = writing Hex 2B to the offset)

Results:
F1: 0 means successful, 1 failed.
F2(d): the hex value of the specified offset(s) (For seem reading only)

How to convert Dec value to bits:
The formula:
Dec value = bit0 x 1 + bit1 x 2 + bit2 x 4 + bit3 x 8 + bit4 x 16 + bit5 x 32 + bit6 x 64 + bit7 x 128
(bit value is either 0 or 1.)

If you don't understand, don't worry. I will show you some useful opcodes in coming posts.

Sponsors links:

Wednesday, March 28, 2007

Backup/restore bootloader/PDS & change bootloader

How to Backup/restore bootloader/PDS & downgrade bootloader
Hello everybody! I have tested this with my 08.A0 V360. I can successfully backup and restore bootloader and PDS, and I think it is possible to downgrade bootloader from 09.02/08.D0/08.A2 to 08.A0 for V360 & L7.

Update: Mike has successfully downgraded bootloader of his L7 from 08.D0 to 08.A0. Now we can also backup & restore PDS for L7 (R4513).

Tool you need
P2K Easy tool v3.9

IMPORTANT: Before you do any part of the following steps, you have to get your phone detected as S Blank Neptune LTE2 first, either by testpointing or by flashing to the BlankNeptuneLTE2 flash file.

Part 1: Downgrade bootloader to 08.A0

1. download my 08.A0 bootloader file (at bottom of the post)
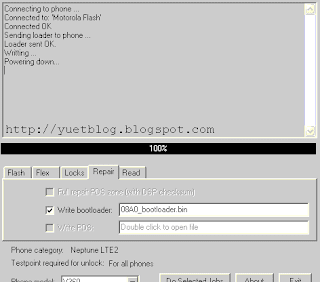
2. start p2k easy tool v3.9, select your phone model, select "repair" tab, choose "write bootloader", double click the text box to choose the downloaded 08.A0 bootloader file
3. disconnect, then connect your phone to computer via USB cable, wait for a few seconds
4. click button "do selected jobs" in p2k easy tool

5. if successful, you should see the messages as shown in the image above


Part 2: backup bootloader

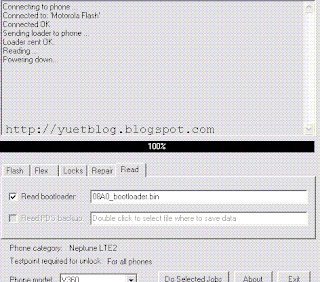
1. start p2k easy tool v3.9, select your phone model, select "read" tab, choose "read bootloader", double click the text box to choose where to save the bootloader file
2. disconnect, then connect your phone to computer via USB cable, wait for a few seconds
3. click button "do selected jobs" in p2k easy tool

4. if successful, you should see the messages as shown in the image above


Part 3: restore bootloader

1. start p2k easy tool v3.9, select your phone model, select "repair" tab, choose "write bootloader", double click the text box to choose the backup bootloader file
2. disconnect, then connect your phone to computer via USB cable, wait for a few seconds
3. click button "do selected jobs" in p2k easy tool

4. if successful, you should see the messages as shown in the image above


Part 4: backup PDS

(You may want to repair the PDS before you make a backup of it, if you get "s blank neptune LTE2" by flashing.)
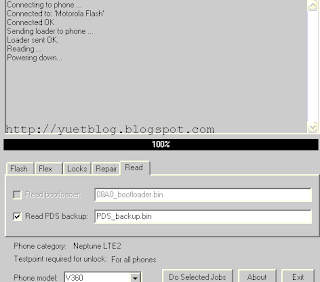
1. start p2k easy tool v3.9, select your phone model, select "read" tab, choose "read pds backup", double click the text box to choose where to save the pds file
2. disconnect, then connect your phone to computer via USB cable, wait for a few seconds
3. click button "do selected jobs" in p2k easy tool

4. if successful, you should see the messages as shown in the image above


Part 5: restore PDS

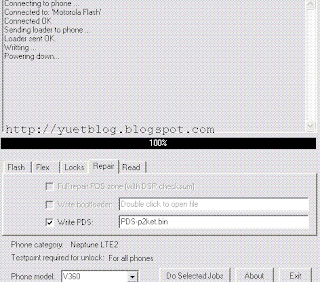
1. start p2k easy tool v3.9, select your phone model, select "repair" tab, choose "write PDS", double click the text box to choose the backup PDS file
2. disconnect, then connect your phone to computer via USB cable, wait for a few seconds
3. click button "do selected jobs" in p2k easy tool

4. if successful, you should see the messages as shown in the image above


(If you get "s blank neptune LTE2" by flashing, you need to do steps in this guide "repair S blank neptune LTE2" to get your phone working again.)

By downloading this file or re-posting any part of my blog post, you agree to the followings:
1. I am not responsible for any damage to your phone, so use it at your own risk.
2. You do not use this file to get profit.
3. You do not provide direct download of the file. Instead, you must link to my blog for downloading the file.


Download:
Yuet's 08.A0 bootloader: [inbrite.com]
Mike's 08.D0 bootloader: [inbrite.com]
09.02 bootloader: [inbrite.com]

Sponsors links:

Thursday, March 15, 2007

10 steps to unlock v360

TEN steps to unlock your v360 PHONE (and maybe others)
Lord Dizzy's Easy Method
(This is another V360 unlocking guide. All credits to Lord Dizzy.)

Steps:
1. Make sure you have Yuet v2.2.1 MP in your mobile / Drivers for your OS already installed;
2. Open P2K Easy Tool, chose "your phone" as your phone model then click on "Flash SHX" checkmark;
3. Select and Flash the "R4513_G_08.B7.DAR_RB_Lang0031_reflash_MOTOX.shx" file (Do Selected Jobs)
4. Now the phone is in "S Blank Neptune LTE2" mode.
5. Go to "Repair TAB" and check Full repair PDS zone and "Do Selected Jobs"
6. For the moment, I don't know if that is just enough to unlock your phone. So, just to be sure:
6.1. Go to "Locks TAB", check "Unlock SP" and then "Do Selected Jobs"
6.2. Now do again the STEP 5, or else your phone will start for a short time with MOTO logo and then shut itself off.
7. Open Flash Backup, select correctly the "Active phone profile" for your phone, and go to "Write data TAB"
8. "Select flash file", and open Yuet v2.2.1
9. Unselect CG1, CG2, CG15 and click "Write data". This only takes few seconds to write back!
10. Your phone is NOW fully unlocked and fully functional with Yuet's MP v2.2.1

Notes (tips & tricks):
1. FULLY CHARGE your BATTERY first. My battery was still full after doing this, but it's better to be sure...
2. Once in "S Blank Neptune LTE2", the phone can be unlocked/rapair PDS without the battery. Its self USB powered!
3. When connecting your phone, always have RSD Lite running and then close it. It will give an "HAB 0x84" error, but that will switch the BL from 0000 to 0300. It is important to be 0300 for P2K Easy Tool to work correctly.
4. After each operation with P2K Easy Tool, you will need to restart the program and reconnect the USB cable, as the P2K Easy Tool shuts off the phone, and you'll need it to be redetected by RSD Lite as "S Blank Neptune LTE2" BL 0300.
5. At STEP 7 you don't need to have RSD Lite running; Flash Backup is smart enough...
6. You may reflash with other Language Packages, but I have not tested.
7. Programs needed: P2K Easy Tool v3.9; Flash Backup v3.0.2; "R4513_G_08.B7.DAR_RB_Lang0031_reflash_MOTOX.shx" file
8. All programs measures ~3.25MB, and if you know what to do this method unlocks your phone in 5 minutes, as there is no large file sent to the mobile.
9. At least, this file contains CG4 and CG7. I think that CG7 is ALL responsible for this, as I see same CG7 in Yuet's unlocking method.

That's all. Good luck everyone!

(If this method doesn't work for your phone, you can try the other methods.)

Download:
R4513_G_08.B7.DAR_RB_Lang0031_reflash_MOTOX.shx:
[rapidshare] [4shared]

Sponsors links:

Friday, March 09, 2007

Flash to "S Blank Neptune LTE2"

Yuet's easy way to get "S Blank Neptune LTE2"
for V360 with 08.A0/08.D0 bootloader
I have found a consistent, reliable and very easy way to turn your V360 (08.A0 bootloader) into "S Blank Neptune LTE2". I have tested it with my 08.A0 V360 more than 10 times and the success rate is 100%. I tested it using RSD Lite 2.5 on windows XP.

I am only sure it will work for V360 with 08.A0 bootloader. I don't have phones to test other bootloaders such as 08.D0 or 09.02, and I am not sure if it works for L7, so don't come and flame me if it doesn't work on your phone model. Please take responsibility for your own decision.

What you need:
1. Yuet's BlankNepTuneLTE2 flash file for 08.A0 & 08.D0 bootloader
2. RSD Lite

Before you start:
1. Fully charge your battery please. You need its power.
2. IMPORTANT: Flash your phone to YuetMod MP v3.2 for V360 or L7.

Steps:

1. Download my flash file at bottom of this post;

2. Open RSD Lite, switch your phone to bootloader mode and connect it to computer via USB;

3. Open the flash file with the RSD Lite and click 'Start' button;

4. Wait for the flashing process to complete, then the phone will try to restart but it won't turn on as expected;

5. Unplug & plug the usb cable from the computer; Your phone should be detected as "S blank neptune LTE2" by RSD Lite; Pretty simple, isn't it?

6. Do part 2 or part 3 of this guide, depends on whether you want to remove sticky firmwares or unlock your phone.

(if this method doesn't work for you, try another method.)

By downloading this file or re-posting any part of my blog post, you agree to the followings:
1. I am not responsible for any damage to your phone, so use it at your own risk.
2. You do not use this file to get profit.
3. You do not provide direct download of the file. Instead, you must link to my blog for downloading the file.


Download:
Yuet's BlankNepTuneLTE2 flash file
for V360 with 08.A0/08.D0 bootloader [inbrite.com] [filecloud]
for V360 with 08.A2 bootloader [inbrite.com]

Sponsors links:

Sunday, March 04, 2007

iPhone theme in YuetMod MPs

New iPhone theme in YuetMod MPs
In YuetMod v2.2 and future releases, I will use this new iPhone theme. This theme is based on Woody's iPhoneMoto skin & DRM. I have enhanced it and fixed some bugs. I will continue to mod and enhance it. I hope you like it.


Download:
YuetMod iPhone Skin & DRM: [inbrite.com]

Sponsors links:

Saturday, March 03, 2007

Edit protected fields in Websession

How to edit protected fields in Websession
In some branded firmwares, some fields in the Websession, such as Homepage or APN are protected. When you want to edit these fields, you have only the numeric entry mode. Effectively make it impossible to change the original setting. This guide will show you how to edit the Websession to change these fields.

Tool you need:
P2K software, such as P2KTools or Moto4lin
HexEditor, such as XVI32 or HexEdit

Steps:

1. on your phone, go to Websession and go into the field that you want to edit;

2. as you can only enter numbers, just enter 99999999; (99999999 is just an example, you can enter other numbers)

3. save the setting;

4. connect your phone via USB, and open P2K software;

5. use P2K software to download the file /a/Websession from your phone to computer;

6. open HexEditor, and open the downloaded Websession;

7. in HexEditor, search for Hex String
39 00 39 00 39 00 39 00 39 00 39 00 39 00 39


8. you can it is shown 9.9.9.9.9.9.9.9 at the right side of the HexEditor. Now you can replace them with the value you want to set, for example, http://yuetblog.blogspot.com. Enter the text at the right side of the HexEditor. (The left side is the Hex values.) Remember to always replace the offset, don't insert new offset; and always leave a dot (Hex value 00) in between each character;


9. save the Websession file, and use P2K software to upload it back to /a/ on your phone;

10. restart your phone and it is done.

Sponsors links:

Thursday, March 01, 2007

Unlock/Repair PDS without Testpoint

Unlock/Repair PDS without Testpoint
get "S blank neptune LTE2" by flashing
for V360/L7 R4513 08.A0/08.D0
(Chinese: 点这里看中文版)

This guide will show you how to unlock your V360 or L7, or get rid of sticky firmwares (such as AER or E0R) from your V360 or L7. The method is a pure software method, no testpoint is required. What you need to do is simply flash a few files using RSD Lite or P2k Easy tool. Set your V360/L7 free!

Tools you need:
1. P2K Easy Tools v3.9 cracked
2. RSD Lite

Before you start:
Fully charge your battery please. You need its power.

Steps:

Part 1: flash to get "S blank neptune LTE2"

Method 1: Follow my guide Yuet's easy way to get "S Blank Neptune LTE2".
Method 2: A guide by forov360 guys.

Part 2: Repair PDS to get rid of sticky firmwares, such as AER.

Follow the steps in my guide "Repair S blank neptune LTE2" to repair PDS and remove sticky firmware.

Part 3: Unlock your phone

1. Close the RSD Lite and open the P2k Easy Tool 3.9, select the phone model,

2. Unplug & plug the usb cable from the computer, remove phone battery and put it back,

3. Go to "Locks" tab and check "Unlock SP". Then click on 'Do Selected jobs';

4. Wait till process is done, you will get "Unlock Ok" message;

5. Close the P2K Easy Tool and take the battery out for 10 seconds;

6. Start RSD Lite and flash your phone to a MonsterPack of your choice (such as one of my YuetMod MPs), then it is done.

7. If this unlocking process won't work for you, try the Repair PDS method.

Sponsors links:

Get "S blank neptune LTE2" by flashing

Get "S blank neptune LTE2" by flashing
for V360/L7 R4513 08.A0/08.D0
by guys from forov360
If you have seen my post about Repair S blank neptune LTE2, you know I am exploring the way to get "S blank neptune LTE2" by flashing a special MP. Now the guys in forov360 have achieved it, and it is tested with V360. I think it should work for L7 with 08.D0 bootloader as well, but do it at your own risk.

Tools you need:
1. P2K Easy Tools v3.9 cracked
2. RSD Lite

Steps:

1. Download the correct flash file according to your bootloader version; (download link at bottom of the post.) (you can check bootloader version by turning off the phone and then press and hold * and # keys, then power on your phone.)

2. Open RSD Lite, and turn on your phone in flash mode by turning off the phone and then press and hold * and # keys, then power on your phone;

3. Connect the phone to computer via USB; Open the flash file with the RSD Lite and click 'Start' button.

4. Wait for the flashing process to complete, then the phone will try to restart but it won't turn on as expected;

5. Unplug the usb cable from the phone; Take the battery out for 15 seconds;

6. Connect the usb cable to the phone, WITHOUT BATTERY and it will say 'Unknown device';

7. Disconnect USB cable, put battery back in the phone;

8. Open 'Device Manager' in your PC (right click in 'My Computer' and click in Manage) and connect the usb cable to the phone. It will recognize it as "Flash Interface");

9. The RSD Lite will detect the phone as "S Blank Neptune LTE2". If not detected, try another USB port and repeat step 5-8;

10. Close RSD Lite;

11. Do part 2 or part 3 of this guide, depends on whether you want to remove sticky firmwares or unlock your phone.

If this method doesn't work for you, try my guide Yuet's easy way to get "S Blank Neptune LTE2".

Credits:
The original tutorial can be found in spanish at forov360.com. All credits to Arkangel (Cristian Hinz), r3drum (Brian N Haslop) and Lukas from forov360 for the flash files in this method.
Credit to Sarah's Angel for translating it to English.

Download:
Flash file for 08.A0 bootloader: [4shared]
Flash file for 08.D0 bootloader: [4shared]

Sponsors links:

Monday, February 26, 2007

Edit font in LangPack

How to edit font in LangPack
This guide is based on the comment by Lucas. All credits to him.

Tools you need:
Binary Editor
SHXCodec or RandomSHX

Steps:

1) Open a LP or a MP using SHXCodec, then split it to obtain the CG4 SMG file. (It can be found in the same folder where you put the LP/MP.) or you can extract the LP/MP using RandomSHX

2) Move the CG4 file to another folder, then open it using the Binnary Editor

3) Press "ALT + M" to Generate Bookmarks

4) Press "ALT + S" to save the bookmarks at name as for example "matrix"

5) Select ALL bookmarks and press "ALT + G" to generate Font Map, save it with the same name "matrix"

6) Now you have 3 files, one is a ".bmp", that is the Original FontMap

(Don't close the Binnary Editor)

7) Edit the .bmp to add the Font. When finished, save it, and back to the Binnary Editor

8) Press "ALT + i", and select the "rft" file with the name that used for example, in this case "matrix", open it

9) Press "Select ALL" and "Import FontMap" and "Close"

10) Close the Binnary Editor

11) Open SHX CODEC, delete all CG except "RAM DOWNLOADER" and "CG4 Language Pack", then select "CG4 Language Pack" press "Replace" and select the CG4 that you edit with BinnaryEditor. Compile SHX file and flash the phone with this. (If you were using RandomSHX to extract the SHX file, you can recompile the SHX using RandomSHX.)

Download:
BinaryEditor: [4shared]

Sponsors links:

Java corelet/midlet permission & iTunes menu icon

How to patch Motorola firmware to have full Java corelet/midlet permission & iTunes menu icon
for R4513 V360/L7
This guide will show you how to patch the R4513 firmware in order to install java corelet (such as iTunes & mediaviewer) and midlets with full permission, and also putting iTunes menu icon.

What you need:
- A R4513 firmware patched to bypass RSA signature verification, and the extracted CG1 bin file. (Read this post about RSA patching first if you are not sure about RSA patch.)
- HexEditor
- P2K software (P2kTools or moto4lin)
- j2me_domain_registry.sm file

Steps:

1. open the CG1 bin file with a HexEditor, such as XVI32;

2. search for this hex string;
B5 FF B0 91 20 00 90 05 90 04 27 0F 1C 1C 22 0C
then change the hex string to:
B5 FF B0 91 20 00 E0 10 90 04 27 0F 1C 1C 22 0C

3. search for this hex string;
1C 05 D1 04 48 37 30 4C F7
then change
1C 05 D1 04 48 37 30 4C F7 ?? ?? ?? E0 DD
to
1C 05 D1 04 48 37 30 4C F7 ?? ?? ?? E0 DE

(?? ?? ?? are three offsets which are different in different firmware, for example, in B7R it is BD F8 0C, in AER it is BD FC 46, in 0FR it is BA F9 F6)

4. search for this hex string;
B5 70 25 00 00 6B 18 1A 78 52 2A 01 D0 09 2A 02
then change the hex string to:
20 01 47 70 00 6B 18 1A 78 52 2A 01 D0 09 2A 02

5. search for this hex string;
20 00 22 02 00 41 5C 6B 2B 05 D1 00 54 6A
then change the hex string to:
35 01 22 03 00 41 5C 6B 2В 04 DA 00 54 6A

6. search for this hex string;
495244414C696E6B0000000000000000000000000000000000 0000001400001CFFFF00E5
then change the hex string to:
4954554E455300000000000000000000000000000000000000 00000014000076FFFFFFFF

(steps 2-5 is patch for java midlet permission, which step 6 is patch for iTunes menu icon.)

7. save the file. Now you have the patched CG1 bin file.

8. follow RSA patch guide to recompile the MP with the patched CG1, then flash it to your phone.

9. after flashing, install iTunes as Corelet on your phone using Motomidman.

10. download the j2me_domain_registry.sm file.

11. use P2k software to backup the original j2me_domain_registry.sm file (in '/a/mobile/certs/root/x509/kjava'), then replace it with the new downloaded file.

12. set iTunes as SIGNED and CORELET using motomidman, then restart your phone.

13. use P2k software to download the /a/mobile/system/mma_ucp file, make a backup, then edit it to add ITUNES menu item. Read this guide if you are not sure how to edit mma file.

14. upload the new mma_ucp file to /a/mobile/system of your phone using p2k software, then restart your phone.

15. you can install other non-corelet java midlets using the bluetooth or midway method. Read this guide for details.

Done. Now you have iTunes with menu icon and java midlets with full permission.

Download:
j2me_domain_registry.sm: [inbrite.com]

Sponsors links:

Friday, February 23, 2007

Change boot picture - part 2

Change boot picture
part 2: replace it using splash replacer
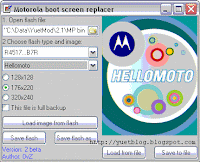
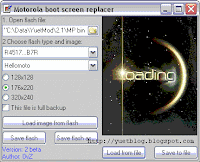
This guide shows you how to replace the startup splash picture using motorola bootscreen replacer.

Tool you need:
Motorola bootscreen replacer
RandomSHX or SHXCodec

Steps:
1. use RandomSHX or SHXCodec to extract/split the MP that you want to mod;

2. Open Offset.ini in folder of motorola bootscreen replacer, to check if the your phone model and firmware are defined in the ini file;

3. if it is defined, go to next step; if not, defined it accordingly if you know the offsets for your firmware. If you don't know the offsets, follow part 1 guide to find out the offsets.

4. open Motorola Bootscreen Replacer and open the flash file (the *2.bin file or the *CG1.smg file you got in step 1);


5. select the "Choose flash type and image" according to your phone model and firmware, for example, V360 R4513...ABR;

6. click "Load from file" and select your custom bmp file that match your screen size;


7. click "Save Flash";

8. follow my "RSA patch" guide to patch RSA and recompile the MP using the new flash file.

Download:
Motorola bootscreen replacer: [4shared]

Sponsors links:

Change boot picture - part 1

Change boot picture
part 1: find out the address of the picture in the flash
You may know that you can use motorola bootscreen replacer to replace the boot pictures (Hellomoto or Welcome pictures). However, before you can do that, you need to find out the address of the pictures in the flash, unless the address is already known and configured in the bootscreen replacer. This guide will show you how to find out the address and configure it in motorola bootscreen replacer.

There are two ways to find out the offsets, the graphical way and the Hex way.

Method 1: the graphical way

Tool you need:
Corona_editor
RandomSHX or SHXCodec

Steps:
1. use RandomSHX or SHXCodec to extract/split the MP that you want to mod;

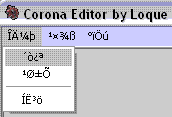
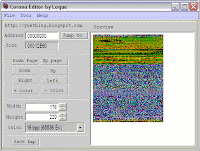
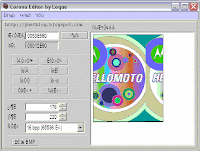
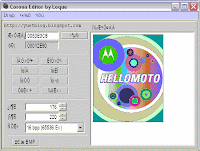
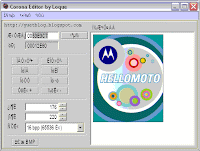
2. open the CG1 bin/smg file in Corona_editor, as shown in following screen;


This is translation of the Corona_editor screen:


3. set width/height/color according to your phone, for example, 176/220/16bpp respectively;

4. click "jump to", then repeat clicking "Down page" until you find a screen similar to the following one;


5. click "Down/Up/Right/Left" button to adjust the picture position, until you see the full picture on screen;


6. click "+ Color" button to have a nicer preview, re-adjust the position if necessary;


7. write down the address, for example: 53E3C7

8. if you want to also replace the Welcome screen, repeat steps 4-7 to find out the address for the "Welcome" picture;

9. open offset.ini file in the folder of motorola bootscreen replacer, add the offset setting as follows;


"backup_shift" is the starting offset of CG1. "backup_shift=92000" is the setting for V360/L7. Other model may have different offset.

10. you are ready to replace the bootscreen pictures. In part 2, I will show you how to replace the boot picture using motorola bootscreen replacer.

(The offset you got using the above method might not be 100% correct, but it is near. You can use the 2nd method to verify the offset.)

Method 2: the Hex way (more accurate)
11. open the CG1 bin in a HexEditor, search for the following Hex strings to find the Hellomoto picture;

14 15 14 15 14 15 14 15 14 15 14 15 14 15 14 15 14 15 14 15 14 15 14 15 14 15 14 15 14 15 14 15 14 15 14 15 14 15 14 15 14 15 14 15 14 15 14 15 14 15 14 15 14 15 14 15 14 15 14 15 14 15 14 15 14 15 14 15 14 15 14 15 14 15 14 15 14 15 14 15 14 15 14 15

12. the offset of the first "14" minus 1 will be the address of the Hellomoto picture;


13. search for the following Hex strings to find the Welcome picture;

F8 00 F8 00 F8 00 F8 00 F8 00 F8 00 F8 00 F8 00 F8 00 F8 00 F8 00 F8 00 F8 00 F8 00 F8 00 F8 00 F8 00 F8 00 F8 00 F8 00 F8 00 F8 00 F8 00 F8 00 F8 00 F8 00 F8 00 F8 00 F8 00 F8 00 F8 00 F8 00 F8 00 F8 00 F8 00 F8 00 F8 00 F8 00 F8 00 F8 00 F8 00 F8 00

14. the offset of the first "F8" minus 1 will be the address of the Welcome picture;


15. follow steps 9 & 10.

Download:
Corona_editor: [4shared]

Sponsors links:

yuetblog.blogspot.com Web